COOKING & PEELING FRESH CHESTNUTS
If you’ve visited my NutGourmet blog, then you may be aware I have an insatiable passion for chestnuts. Fresh chestnuts are top of the list of special seasonal foods during the holidays. Part of what makes them so special is that they’re available for such a short season. They’re harvested in September and by Christmas they will be a rarity in the grocery store, except for the Asian markets that import chestnuts from China.
Chestnuts offer delicate sweetness and potato-like texture
So what is it about chestnuts that makes some of us fall passionately in love them? It’s a complex question, because chestnuts have so many wonderful qualities. There’s nothing like them on the planet! Their appearance, flavor, and texture are not like any familiar nuts like almonds or walnuts, yet they’re classified as tree nuts. For me, it’s their divine sweetness–not the kind of sweetness sugar or other sweeteners offer. They’re not as sweet as dates or even a ripe apple or pear. Yet, chestnuts have a distinct sweetness that could be considered somewhat delicate, yet deliciously definitive.
 They also have a texture unlike any other nut we’re familiar with. Instead of being firm and crunchy like almonds or softer like pine nuts, chestnuts are starchy with a texture that could be compared to a cooked potato. Yet, they’re able to retain their firm shape when cooked and can be eaten whole or chopped. They can be mashed into a puree and incorporated into sauces, puddings, beverages, or included in baked desserts.
Unlike other nuts, chestnuts are practically fat free and contain only 2% fat compared to almonds, which are about 80% fat. Chestnuts also contain vitamin C, while other nuts do not. Chestnuts can be eaten raw but deliver far better flavor and texture with cooking. You can incorporate cooked chestnuts into beverages, soups, salads, stir-fries, casseroles, puddings, pies, baked goods, and desserts of all kinds.
If this is the first time you’ve considered buying fresh chestnuts, think of it as the perfect time to jump in and give these wonderful nuts an opportunity to show their stuff in a delicious dish. Many years ago, chestnuts totally won me over. Give them a try—I’ll bet you’ll get hooked on them, too.
So many people feel intimidated by chestnuts and haven’t the faintest idea how to cook them, peel them, or even incorporate them into a recipe. With this step-by-step guide that follows, you’ll see how easy it is to work with them and store them until you’re ready to add them to a tasty recipe.
Chestnut Cooking and Peeling Step-by Step Guide
Tools: All you really need is a paring knife with a firm, short blade and a good point. The blade should be no longer than 2 or 3 inches long. If you have a chestnut knife, all the better, but it’s really not essential.


A chestnut knife has a blade only 1 1/4 inches long with a curved tip. The blade is very firm, making it easy to grip the chestnut peel and pull it off. You can do the same thing with a firm paring knife, but if you would like to buy a special chestnut knife, you won’t find it in the average kitchen shop. You can order one directly from some of the chestnut growers in the resources section below.
American Grown vs. Asian Imported Chestnuts: American grown chestnuts can be purchased online. They’re considerably smaller and more expensive than those imported from other countries. I think they’re also much sweeter. The quality I like best about American grown chestnuts is that they’re far easier to peel than the ones imported from China or Italy. If I run out of the chestnuts I’ve ordered, then I turn to the imported ones I find in the grocery store. And I sigh resentfully as I peel every last one of them, muttering under my breath, “These are such a bitch to peel!” The one advantage of imported chestnuts is that they’re often available through March.
Step 1: Make a criss-cross cut into each chestnut to help it release steam. Some people make the cut only on one side, but I find chestnuts much easier to peel with criss-cross cuts on both sides. To make the cuts, put a chestnut on a cutting board, hold it firmly with one hand, and make the cuts with the other. Don’t be timid. Poke the tip of the knife right into the chestnut shell, about 1/4-inch to 3/8-inch deep.
Alternatively, make a horizontal cut through the shell, all the way around the center portion of the chestnut, as if you were drawing the equator with your knife . This kind of cut makes it very easy to peel the chestnut after cooking.
Step 2 Cooking the Chestnuts:
 Method 1 Boiling (preferred): Put the prepared chestnuts in a saucepan and add enough water to cover the nuts by about three inches. For 1 pound of chestnuts, I use a 4-quart saucepan. Cover the pot and bring it to a boil over high heat. Reduce the heat to medium and simmer the chestnuts, covered, for 25 to 35 minutes.
  Then, turn off the heat. The shorter time will result in firm, fully cooked chestnuts. Longer cooking will make them softer to use in puddings and creamy recipes. Some varieties of chestnuts cook more quickly, while others take a few minutes longer. After 25 minutes of cooking, take one out of the pot, peel it, and give a taste test. If it’s done, turn off the heat.
Method 2 Roasting: Preheat the oven to 375 degrees F. Pile the prepared chestnuts onto a baking sheet and roast them 15 to 20 minutes. Cool them slightly and peel away. Some chestnut aficionados suggest soaking the chestnuts for about 20 minutes before roasting, claiming it makes them easier to peel.
Method 3 Stir-frying: Put the prepared chestnuts into a large, deep skillet with a small amount of oil, about one tablespoon for each pound of chestnuts in the shell. Use high heat and cook the chestnuts for about 10 minutes, tossing them continuously with a wooden spoon or shaking the pan to prevent the direct heat from burning them.
I prefer the boiling method because I’ve experienced uneven results with the roasting and stove-top methods. Quite often the chestnuts also need to be boiled to soften them enough for most recipes.
Step 3: Use a slotted spoon to remove only a few chestnuts at a time from the  pot, about 4 or 5, and put them into a small bowl. The nuts will peel much easier when they’re quite warm. Have ready a bowl for the discarded nut shells and another bowl for the peeled chestnuts.
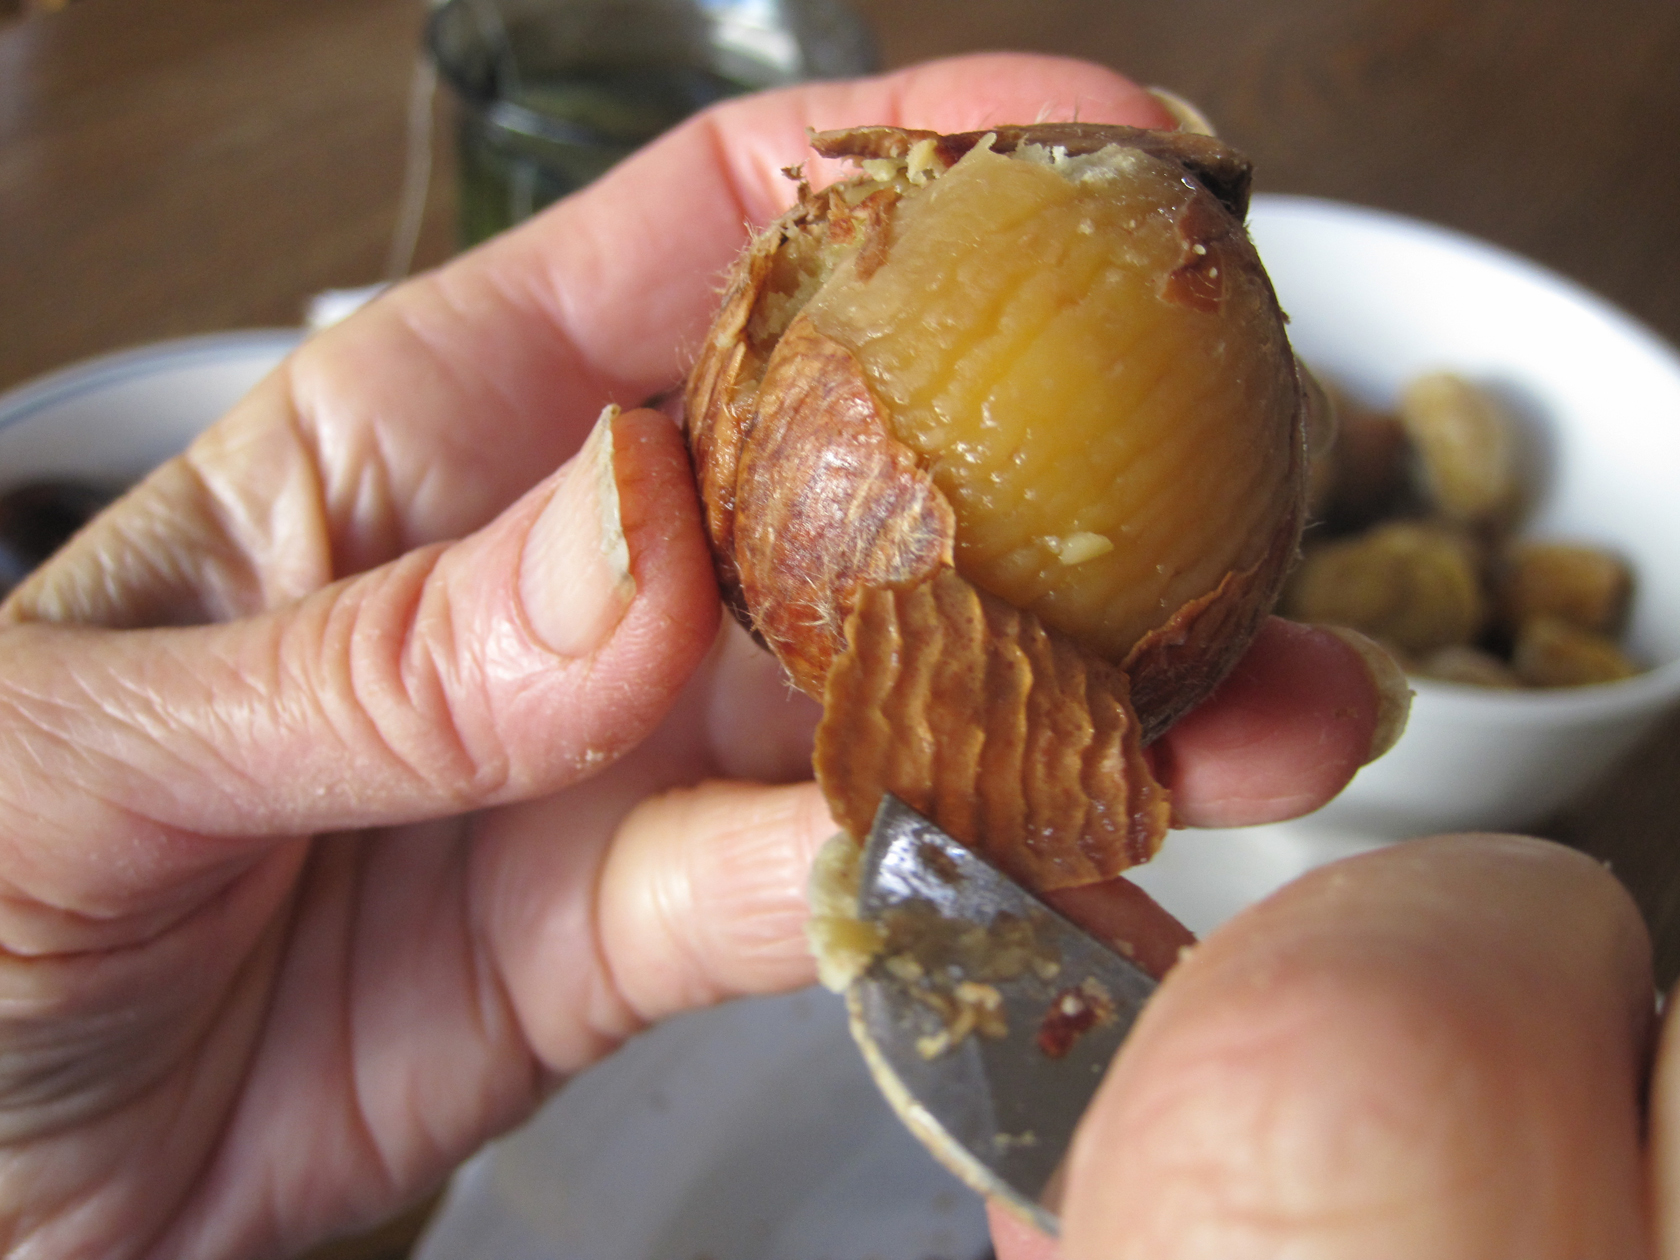
Step 4: Now you’re ready to peel. You can use the firm paring knife or a chestnut knife. Fix yourself a nice cup of tea, turn on some of  your favorite music, and prepare for a relaxed peeling session that might take 20 to 30 minutes, depending on how many chestnuts you’ve cooked. Poke the point of the knife into the criss-cross cut and pull up on the peel.
Step 5: Chestnuts have a firm outer shell and and a soft inner skin called the pellicle. Sometimes both the outer shell and inner skin will come off together, but frequently they’ll have to be peeled away separately. Imported chestnuts cling fiercely to their pellicle (the skin) and do not release them without a tug of war.

 If you notice the chestnuts becoming difficult to peel, they’re probably quite cool. Don’t fight with them. Just put them back into the pot. Make sure there is enough water to cover the chestnuts and bring them to a boil again. Turn off the heat and return to the zen of peeling.
 I hope you’ve rewarded yourself and tasted a few tidbits of broken chestnuts during the peeling session. The cooked and peeled chestnuts are now ready for incorporating into a recipe.
Family Tradition: I’ve become very fond of chestnut peeling and have convinced my family to join me in a peeling session the night before Thanksgiving. It’s actually become a cherished family ritual with everyone sitting around the kitchen table, knives in hand, and peeling away. it certainly makes quick work of the task with the American grown chestnuts. If I’ve saddled them with imported chestnuts, they swear just like I do and often leave me to finish the job. I really can’t blame them.
Storing the Chestnuts: If you plan to use the chestnuts within 3 or 4 days, cover them with plastic wrap and store them in the coldest part of the refrigerator. For longer storage, put them into a heavy-duty plastic bag and freeze them. Allow several hours to defrost them at room temperature before using. Defrosting chestnuts in the refrigerator will result in mushy nuts.
Well, you’ve just finished one of the most challenging task of the season. Now you’re ready to add those tasty nuggets of freshly cooked chestnuts to a delicious recipe.
Below are online resources for ordering fresh American-grown chestnuts.
Chestnut Resources:
Girolami Farms
11502 East Eight Mile Road
Stockton CA 95212
209.931.0158
Croft LLC,
121 E Front St., Suite 100
Traverse City, MI 49684
231-633-1277
Correia Farms
Phone: 866-492-4769
Allen Creek Farm
29112 NW 41st Ave.
Ridgefield, WA 98642
PO Box 841, Ridgefield, WA 98642
360-887-3669
 SAVORY CHESTNUT AND FRUIT STUFFING
 and adding one of my very favorite foods of the autumn season–CHESTNUTS! Here’s a quick recipe for roasting chestnuts. If you prefer to boil the chestnuts, a method I turn to most often, here’s my post on Cooking and Peeling Chestnuts with step-by-step directions:
 Oh, and by the way, this delicious recipe is from my Vegan for the Holidays Cookbook!