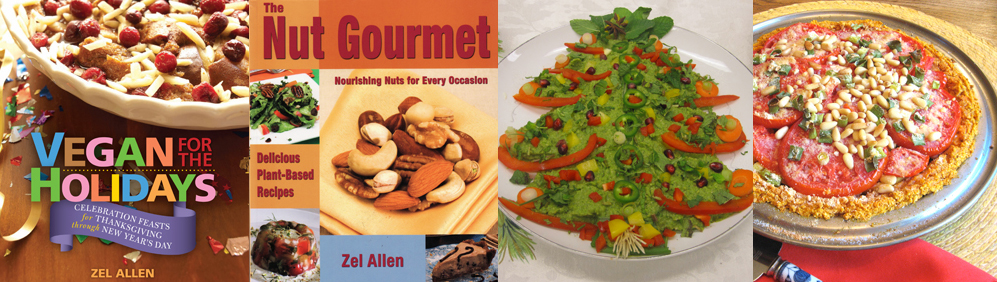
TOMATO-PINE NUT PIE WITH SWEET POTATO AND NUT CRUST
 Such a beauty and such a company favorite! You don’t even have to wait for the holidays to enjoy this tasty dish, because all the ingredients are available year-round.
In summer, when the home-grown or farm-stand tomatoes are fire-engine red, melt-in-the-mouth sweet and ultra juicy, the pie has a bright, cheery appearance. So tempting, the summer pie looks like the one above.
The bright tomato color turns a bit pastel in winter, but the pie still pops with the rich  Italian-inspired flavor of homemade “Parmesan” and always makes guests ooohh and aaaahhh a little. I think it’s because this pie is so unique and looks really appetizing and festive.
The first thing my guests notice is the unusual crust. And, yes, it is certainly different. Rather than a standard flour-based pie crust, this one features sweet potatoes and almonds and balances the savory flavors with a pleasant, delicate sweetness.
For a small gathering, one pie is just right and can actually go a little farther if there are several other dishes on the menu. When I was expecting about 15 people, I doubled the recipe and prepared it in a large rimmed baking sheet. Of course, I planned an additional entrée and several side dishes, too. Made in the baking sheet, the pie becomes more of a tart and makes a delicious appetizer, too.
 TOMATO-PINE NUT PIE WITH SWEET POTATO AND NUT CRUST
Yield: 1 (9-inch) pie or 6 servings
Crust
12 ounces sweet potatoes or yams, peeled and cut into 1-inch pieces
1 1/4 cups whole almonds
2/3 cup mashed tofu
1/4 teaspoon salt
- Preheat the oven to 350 degrees F. Light oil a 9-inch pie pan.
- To make the crust, put the sweet potatoes in a 2-quart saucepan with water to cover. Cover and bring to a boil over high heat. Decrease the heat to medium and simmer for 5 minutes, or until the sweet potatoes are fork-tender. Drain the sweet potatoes well, transfer them to a large bowl and mash them well. Set aside.
- Put the almonds in a food processor. Process until they are finely ground, yet still retain a little texture. Add the tofu and salt and process until well incorporated, stopping occasionally to scrape down the work bowl. Spoon the tofu mixture into the bowl with the sweet potatoes and mix well.
- Spoon the sweet potato mixture into the prepared pan. Use your fingers to press it onto the bottom and up the sides of the pan. Build up the sides of the crust 1/2 -inch higher than the pie pan. Bake the crust for 15 minutes and let cool.
Filling
2 green onions, sliced
1 to 2 large cloves garlic, minced
1/3 cup pine nuts
2 to 3 tablespoons Homemade Parmesan (recipe below) or prepared vegan Parmesan
2 to 3 tablespoons cornstarch
1 small eggplant, peeled and sliced into 1/8-inch slices
Salt
Freshly ground pepper
4 to 5 large red or green tomatoes, seeded and sliced
- To make the filling, put the green onions, garlic, pine nuts, and Homemade Parmesan in individual bowls. Sprinkle the cornstarch on a plate.
- Cover the bottom of the crust with one layer of eggplant slices. (This prevents the crust from getting soggy). Reserve remaining eggplant for another use. Sprinkle the eggplant slices with salt and pepper.
- Dredge only the first layer of the tomato slices in the cornstarch. Arrange the dredged tomato slices over the eggplant, filling all the spaces with small bits of tomato. Sprinkle lightly with salt and pepper. Sprinkle one third each of the green onions, garlic, pine nuts, and Homemade Parmesan over the tomatoes. Repeat the process to make three layers.
- Bake for 45 minutes. Let cool 10 to 15 minutes before serving.


Note: If using green tomatoes, the pie might have to bake another 15 minutes.
This recipe is one of the tasty dishes from my Vegan for the Holidays cookbook. Order from Vegetarians in Paradise http://www.vegparadise.com or from Amazon.com
HOMEMADE PARMESAN
Often I’ve come to rely on a sprinkle of vegan Parmesan to add sparkle to a dish, soup, a casserole, or an appetizer. With only five ingredients, this recipe is almost instant to make and tastes enough like the real thing to put the Italian touch on everything from pizza to minestrone and a host of holiday or everyday dishes.
1 cup almonds
1 tablespoon plus 1 1/2 teaspoons nutritional yeast flakes
1 teaspoon onion powder
1 teaspoon salt
1/2 teaspoon garlic powder
- Put the almonds in a food processor. Process until they are finely ground, yet still retain a bit of texture. (Avoid over-processing or it will turn into almond butter.)
- Add the nutritional yeast, onion powder, salt, and garlic powder and pulse until well mixed. Transfer to a covered container and refrigerate until ready to use. Covered and refrigerated, Homemade Parmesan will keep for 3 months.


