CELEBRATE A WHITE CHRISTMAS AT THE TABLE

WHITE CHRISTMAS TRIO WITH SAVORY WALNUT SAUCE

A beautiful main dish, this trio features a tasty grain as the base, topped with a hearty serving of vegetables. The final topping is a snowy white, ultra creamy walnut sauce garnished with fresh pomegranate seeds and a sprinkle of parsley.

While it looks complicated, it’s really quite manageable with good planning. The bulgur, vegetables, and the sauce can each be made a day ahead and stored in a container that can be gently warmed in the oven. You don’t even have to warm the sauce–just enjoy it at room temperature and it will be delightfully creamy and delicious.

This is a fun dish to serve because it lends itself to inventively creative presentations. Assembling the dish will tap into your innovative notions and allow you go be as expressive as your inner artist allows. If you prefer simplicity, that’s totally OK and your family will still enjoy a luscious and healthy whole grain dish complete with vegetables and a unique, walnut-based sauce that’s white as snow to top off the White Christmas Trio.

To fill out the meal, I would also add legumes, a side vegetable, and a gorgeous salad. Of course, a delicious appetizer makes a great start to the festivities. Perhaps the Yin Yang Thanksgiving Paté. A lighter choice might be the Smoky Garlic Stuffed Endive. I’ve posted some fun choices for your holiday dessert and will let you explore the many recipes by clicking on Desserts.

WHITE CHRISTMAS TRIO WITH SAVORY WALNUT SAUCE

Yield: 6 to 8 servings

Bulgur Wheat

1 1/2 cups coarse bulgur wheat or Basmati brown rice

3 cups water

1 1/2 teaspoons salt

1/3 cup raisins

Walnut Sauce

3 cups walnuts

3 cups vanilla soymilk

1 to 2 tablespoons nutritional yeast

1 teaspoon salt, or to taste

1/2 teaspoon organic sugar

1/4 teaspoon pepper

Pinch cayenne (optional)

Vegetables

2 large carrots, coarsely grated

2 large zucchini squashes, coarsely grated

1 large yellow summer squash, coarsely grated

1 medium onion, chopped

2 tablespoons water

1 tablespoon extra virgin olive oil

2 cloves garlic, thinly sliced, crosswise

1/2 teaspoon oregano

1/2 teaspoon basil

1/2 teaspoon marjoram

1/2 to 1 teaspoon salt or to taste

Freshly ground black pepper

Juice of 1/2 lemon

Garnish

1/2 to 3/4 cup pomegranate seeds

2 tablespoons finely chopped parsley

TO MAKE THE BULGUR WHEAT, combine the bulgur, water, and salt in a 2-quart saucepan. Cover, and bring to a boil over high heat. Reduce the heat to low, and steam for 12 to 15 minutes (steam Basmati brown rice 35 to 45 minutes, or until tender).

Put the raisins in a small bowl and cover with hot water. Set aside to plump them while preparing the remaining ingredients.

TO MAKE THE WALNUT SAUCE, put the walnuts, soymilk, nutritional yeast, salt, pepper, and sugar in a blender. Process until smooth and creamy. Adjust seasonings as needed. The sauce will thicken when standing. Set aside in a saucepan and warm gently before serving.

TO MAKE THE VEGETABLES, combine the carrots, zucchini, yellow squash, onions, water, olive oil, garlic, oregano, basil, marjoram, salt and pepper in a large deep skillet. Cook and stir over medium-high heat until the vegetables are soft, about 5 to 7 minutes. Add 1 or more tablespoons of water as needed to prevent burning the vegetables. Adjust seasonings and add lemon juice to taste.

Drain the water from the reserved raisins and add them to the vegetables and toss well.

TO ASSEMBLE THE DISH:

  • Mound the bulgur wheat onto a large serving platter.
  • Spoon some of the walnut sauce over the bulgur, leaving a 1-inch border of the bulgur showing.
  • Form a ring of the cooked vegetables, leaving a 1-inch border of bulgur wheat around the edges.
  • Finish with a sprinkle of pomegranate seeds and parsley over the top.
  • Serve the remainder of the walnut sauce on the side.

TIME TO DRESS IN GLEAMING AUTUMN COLORS!

HIDDEN TREASURE SALAD

FOR THE HALLOWEEN FESTIVITIES

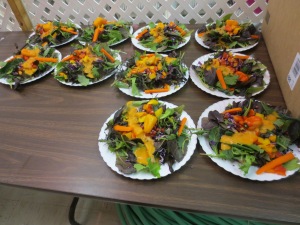
A Halloween treasure hunt is always a fun adventure, and even more intriguing when the hunt is right on your plate. This autumn-inspired salad hides a delicious and highly nutritious little treasure that becomes even tastier when drizzled with a lively dressing made from a base of cooked sweet potatoes.

I prepared this salad for a banquet held in late October and was fortunate enough to hear some of the enthusiastic comments. I think it was the dramatic fall colors that sparked a few oooohs.

And I have to confess, I had fun concocting this salad course–the colors still dazzle me! I love the brilliant color contrast of those deep purple lettuces accented with the yellows and oranges that top the greens.

I thought the Hidden Treasure Salad made such an eye appealing presentation, why serve it just for Halloween. The salad would make a gorgeous first course for Thanksgiving, too! And, the ingredients are available throughout the entire autumn and winter season.

I hope you’ll give the Tangy Sweet Potato Dressing a try. It was the autumn season, my favorite time of year, that inspired me to cook up some sweet potatoes and create a unique and very tasty salad topping that shines a spotlight on these lovely spuds–they’re one of my favorite foods.

I’m aware I’ve strayed from my December holiday dishes, but how could I resist–this is a simple recipe that just wants to be shared for the fun of it. Enjoy!

HIDDEN TREASURE SALAD

FOR THE HALLOWEEN FESTIVITIES

Yield: 6 servings

Hidden Treasure Salad

12 mini white potatoes

6 yellow or orange mini bell peppers


12 ounces mixed baby lettuces

1 red bell pepper, chopped

1 yellow bell pepper, chopped

1 orange bell pepper, chopped

4 cups finely chopped purple cabbage


2 medium carrots, cut into 2-inch long, thin julienne

1 cup pomegranate seeds

6 large pimento stuffed green olives (optional)

Tangy Sweet Potato Dressing (Makes about 2 3/4 cups)

1 1/2 cups plus 2 tablespoons water

3/4 pound yellow or orange sweet potato, peeled, cooked, and mashed

1/2 cup fresh lemon juice

5 to 6 pitted dates, snipped in half

1 garlic clove

1 1/4 teaspoons garlic powder

1 1/4 teaspoons onion powder

1 teaspoon ground nutmeg

1 teaspoon salt, or to taste

TO MAKE THE HIDDEN TREASURE SALAD, preheat the oven to 400 degrees F. Put the mini potatoes and mini bell peppers on a baking sheet and put them in the oven. Set the timer for 20 minutes and remove the mini peppers. Set them aside to cool. Roast the potatoes 10 minutes longer for a total of 30 minutes. Remove them and set them aside to cool while preparing the remaining salad ingredients.

Combine the lettuces, red, yellow, and orange bell peppers, and purple cabbage in a large salad bowl and mix well.

TO ASSEMBLE THE SALAD, place 2 mini potatoes in the center of each salad plate. Heap the lettuce mixture over the potatoes. Place 2 or more carrot sticks on each plate and sprinkle the salad with pomegranate seeds. Top each salad with a roasted mini pepper and a pimento stuffed green olive. Serve the dressing on the side.

TO MAKE THE DRESSING, combine all the dressing ingredients in a blender and process until smooth and creamy.

Using a funnel, pour the dressing into one or two narrow-neck bottles for easy serving. Use immediately or chill until ready to serve.

For convenience, the dressing can be prepared up to 2 days ahead. Refrigerated, it will keep for up to 6 days.

Note:

For a tasty dressing variation, a add 3 tablespoons rice vinegar and 3 pitted dates and blend until smooth and creamy.


POMEGRANATE SALAD WINS THE HOLIDAY RIBBON!

Pomegranate Apple Salad5 copyPOMEGRANATE-APPLE SALAD WITH GINGER AND MINT

Taking full advantage of the fruits of the season, this sweet and tangy tart salad makes an eye-appealing side dish, adding diversity in flavor and texture. And, it’s so easy to assemble. You’ll quickly notice that with each bite of this zesty and flavorful fruit mélange, the plump, juice-filled pomegranate seeds release their rich, ambrosial juices, and deliver bracing sweetness with a pleasing crunch.

I’ve made this salad many times over the years and discovered it’s easy to vary its good looks by sometimes cutting the fruits into small dice, while on other days I make the salad much chunkier.whole-and-sliced-pomegranates

Unfortunately, this is not a salad you can make a day or two ahead because it rather dramatically loses its bright looks as well as fresh flavors. You CAN remove the seeds from the pomegranate a day or two ahead and refrigerate them.  If you make sure to have everything at hand, it’s a fairly quick assembly.

 POMEGRANATE-APPLE SALAD WITH GINGER AND MINT

 Yield: 6 servings

1 large pomegranate

2 sweet, crisp apples, unpeeled, choppedPomegranate Apple Salad5 copy

8 ounces edamame, cooked and shelled

1 navel orange, peeled and chopped

3 tablespoons maple syrup

2 tablespoons freshly squeezed lemon juice

2 tablespoons pomegranate molasses

1 tablespoon balsamic vinegar

2 to 3 heaping teaspoons minced peeled fresh ginger

3/4 teaspoon salt

1 to 2 tablespoons minced fresh mint leaves

  1. Carefully following the handy directions below, remove the pomegranate seeds, drain them well and put them in a large bowl.
  1. Add the apples, edamame, orange, maple syrup, lemon juice, pomegranate molasses, balsamic vinegar, ginger, and salt and toss well to distribute the ingredients evenly.
  1. Add half the mint leaves and mix well. Garnish the top of the salad with the remaining mint leaves. Serve immediately or refrigerate. Serve the salad within 2 hours to preserve the bright colors.

Two Techniques for Retrieving Pomegranate Seeds

Pomegranate-seeds1Removing the pomegranate seeds from a fresh pomegranate is easy. Here’s one handy technique:

  1. Put on an apron. Pomegranate juice will most likely splatter a bit, so protect your clothing. Have a deep bowl handy. Wash the pomegranate and cut it in half crosswise. Put the cut sides up and make a couple of cris-cross cuts into each half.
  2. Take one half, turn it upside-down over the bowl, and use your fingers and thumbs to break up the sections. Some of the seeds will begin to fall out. Tap on the top to release more seeds.
  3. Continue to use your fingers and thumbs to loosen the seeds from the pith by pushing on them until all the seeds are in the bowl. Use them immediately or put them into a covered container and refrigerate them. They’ll keep well for up to a week.

______________________________________________________

Here’s another method that involves releasing the pomegranate seeds in water:

Ripe pomegranate on the branch. The foliage on the background.

Ripe pomegranate on the branch. The foliage on the background.

  1. Place a colander into a very large, deep bowl and fill the bowl with enough water to submerge a large pomegranate. A salad spinner is the perfect bowl and colander set-up.
  2. Put the pomegranate on a cutting board and cut the top off. Carefully, cut the pomegranate vertically into six sections.
  3. Working with one section at a time, lower it into the water with the seeds facing downward. Use your fingers to release the seeds into the water.
  4. Most of the seeds will sink to the bottom, while the pith floats to the top for easy removal with a skimmer. Repeat the process with the other pomegranate sections. Then, simply lift the colander and shake off the excess water.

For convenience, remove the pomegranate seeds a day ahead, put them in a container, and refrigerate them until ready to use. To prevent the naturally bright colors of the pomegranate seeds and edamame from becoming muddy looking, assemble the salad an hour or two before serving, and the salad will look bright and cheery and very inviting.

MEXICAN FLAG GRACES THE HOLIDAY TABLE WITH PANACHE!

Chiles en NogadaCHILES EN NOGADA

This gorgeous dish was actually created in 1821 in Central Mexico to celebrate Mexican Independence Day, which occurs on September 16, 1810. I came across this recipe when a local library asked me to do a vegan demo on regional Mexican cooking to celebrate Mexican American Heritage month. At first glance, you’ll see the bright colors of the Mexican flag–red, white, and green.

The finished dish is actually stuffed poblano chiles with a sauce made of walnuts.  I think you’ll agree it makes a sensational presentation.

I found the recipe is so appealing and so festive looking, I felt it deserved a place at the holiday table from Thanksgiving through New Years. There’s just one little hitch that’s easily solved. Peaches, which are featured in the recipe, are no longer available in November or December, but sweet fruits like persimmons and pears stand in quite well.

Chiles en NogadaThe other challenge–the original recipe was quite fatty and contained meat, milk, and cheese. No problem–I replaced the meat with beans and created the filling from a composite of several recipes. I’ve added diced zucchini and fresh fruits like diced apples and Fuyu persimmons in place of the candied cactus.

Also, I’ve not battered and fried the stuffed chiles, because I wanted to offer a healthier, less fatty option.

My recipe contains no sugar, but uses the fruits as delicate sweetening. For the Walnut Sauce I use vanilla soymilk and non-dairy cheese made from pea protein to replace the traditional dairy products.

The dish is said to have been created by Puebla nuns for a visiting dignitary, emperor Augustin de Iturbide, a Mexican military chieftain who was instrumental in the Mexican independence movement.

That man didn’t realize how fortunate he was. Chiles en Nogada was not a quick and easy dish to make because it has several components that each require special attention. One recipe I encountered contains 40 different ingredients! Don’t worry, it’s not this one!

In those historic days, there no blenders. To make the creamy Walnut Sauce, they had to use a grinding stone called mano and metate that works like our mortar and pestle.

I’ve created a simplified version of the recipe, but it still involves 3 components–charring the chiles on the stovetop and peeling them, making the filling, and blending the sauce.

Once all the chiles are charred and cleaned and the fruits and vegetables are chopped, the recipe comes together quickly and can be prepared in stages.

For guests who are not fond of chiles, here’s an alternative presentation. Instead of stuffing Chiles en Nogada Nakedthe chiles, I used them as a border surrounding the filling. That way, guests at the buffet table can simply take a helping of filling and side-step the chiles. The topping is slivered almonds.

Don’t side-step the sauce, though. It’s delicious! Just serve it on the side.

 Chiles en Nogada

CHILES EN NOGADA

Yield: 8 servings

8 fresh poblano peppers

FillingChiles en Nogada

1/2 medium onion, chopped

2 cloves garlic, minced

3 to 4 tablespoons water

1 (14-ounce) can diced tomatoes, drained

1 medium zucchini, diced

1 medium tomato, diced

1 bay leaf

3/4 teaspoon salt

1/2 teaspoon ground cinnamon

1/2 teaspoon ground cumin

Pinch ground cloves

1 (15-ounce) can black beans, rinsed and drained

1 medium apple, cored, and diced

1 firm fresh peach, persimmon, or pear, cored and diced

1/4 cup golden raisins

1/4 cup sliced or slivered toasted almonds

Chiles en NogadaSauce

3 cups vanilla soymilk or plain soymilk with 2 teaspoons organic sugar          added

2 cups walnuts

3/4 cup non-dairy shredded mozzarella

Pinch salt

Freshly ground black pepper

Garnish

8 large romaine lettuce leaves

3/4 cup pomegranate seeds or 1/2 red bell pepper, diced

4 green onions, green part only, chopped

  1. Have ready a large rimmed baking sheet lined with parchment or a Silpat.
  2. TO PREPARE THE CHILES, put the poblano peppers directly over a gas flame, using several burners simultaneously. Working with long-handled tongs, turn the peppers frequently until blistered and blackened on all sides, about 5 to 7 minutes. Put the blackened peppers into a bag or wrap them in a towel and set aside for about 5 to 10 minutes to loosen the skins. Alternatively, plunge the blackened peppers into a bowl of water. Rub off the skins under running water to clean the charred chiles.
  3. Carefully cut a vertical slit in each chile and cut out and discard the core and any stray seeds. Arrange the chiles on the baking sheet and set aside.
  4. TO PREPARE THE FILLING, preheat the oven to 350 degrees F. Combine the onion, garlic, and water in a large deep skillet. Cook and stir over medium-high heat, stirring frequently until lightly browned, about 7 to 10 minutes. Add 1 or more tablespoons of water as needed to cook the onions and prevent burning.
  5. Add the diced tomatoes, zucchini, fresh tomato, bay leaf, salt, cinnamon, cumin, and cloves and cook about 3 to 4 minutes.
  6. Add the black beans, apple, peach, raisins, and almonds and cook about 3 to 4 minutes, or until the fruits are just softened.
  7. Open the slits in the chiles and spoon a generous portion of filling into each of them, filling them fully. Close the slits, enclosing the filling completely. Put the chiles in the oven for 10 to 12 minutes to warm through.
  8. TO PREPARE THE SAUCE, put the soymilk, walnuts, mozzarella, salt, and pepper in a blender and process until smooth and creamy.
  9. TO SERVE, line each person’s dish with a lettuce leaf. Put one stuffed poblano on each dish and spoon a generous amount of the sauce over the top and sides, coating each one completely. Garnish with a generous sprinkle of pomegranate seeds or chopped red bell pepper and green onions.


CAN’T BEET POMEGRANATE SALAD FOR THANKSGIVING!

sharonpalmer_headshot3Sharon Palmer RD generously shares her beautifully composed BEET AND POMEGRANATE SALAD to start the holiday meal with a pack of antioxidants packaged so appealingly no one will turn down a hearty serving.

Sharon has created an award-winning profession based on combining her two great loves–food and writing. As a registered dietitian with 16 years of health care experience, she channels her nutrition experience into writing features covering health, wellness, nutrition, and cuisine. Sharon is also a passionate writer about food and environmental issues, having published a number of features on plant-based diets, hunger, agriculture, local and organic foods, eco-friendly culinary practices, sustainability, food safety, and food security. Over 850 of Sharon’s features have been published in a variety of publications, including Better Homes & Gardens, 6x9Prevention, Oxygen, LA Times, Cooking Smart, and CULINOLOGY. Her books include The Plant-Powered Diet: The Lifelong Eating Plan for Achieving Optimal Health Beginning Today and Plant-Powered for Life: Eat Your Way to Lasting Health with 52 Simple Steps & 125 Delicious Recipes. Sharon is the editor of the acclaimed health newsletter, Environmental Nutrition and nutrition editor for Today’s Dietitian. She writes every day for her popular Plant-Powered Blog. In addition, Sharon is a nutrition advisor for the Oldways Vegetarian130 Network and served as a judge for the James Beard Journalism awards. She was the proud recipient of the Loma Linda University Distinguished Alumnus Award in 2013.

Living in the chaparral hills overlooking Los Angeles with her husband and two sons, Sharon enjoys visiting the local farmers market every week and cooking for friends and family.

Beet and Pomegranate Seed Salad pic3BEET AND POMEGRANATE SALAD

Ingredients:
4 cups packed mixed baby greens
2 cups packed assorted micro-greens
2 cups sliced baby beets, cooked and chilled
1 cup fresh pomegranate seeds
3 tablespoons coarsely chopped walnuts
1/4 cup freshly squeezed orange juice

1 tablespoon plus 1 teaspoon extra virgin olive oil
1/8 teaspoon ground black pepper
1 garlic clove, minced

Directions:
1. Arrange the baby greens in a salad bowl or on a platter. Top with the micro-greens.
2. Arrange the beets on top of the micro-greens and sprinkle with pomegranate seeds and walnuts.
3. Whisk together the orange juice, olive oil, black pepper, and garlic in a small bowl.Drizzle the vinaigrette over the salad and serve immediately.

GOTTA HAVE STUFFING FOR THANKSGIVING!

StuffingSAVORY CHESTNUT AND FRUIT STUFFING

Without fail, Thanksgiving brings out our most nostalgic memories. Often those treasured times call to mind remembrances of the delicious stuffing our mothers and grandmothers brought to the table at holiday time.

Those flavors we remember so fondly may have been savory, sage-infused, and earthy, or perhaps they were sweet, fruity, and spicy. Each year I debate whether to prepare a savory stuffing or one more focused on the fruity side.

This year I’ve settled my own conundrum by uniting both sides of the sweet-savory debateChestnuts roasting and adding one of my very favorite foods of the autumn season–CHESTNUTS! Here’s a quick recipe for roasting chestnuts. If you prefer to boil the chestnuts, a method I turn to most often, here’s my post on Cooking and Peeling Chestnuts with step-by-step directions:

Cooking & Peeling Chestnuts, Illustrated

If you don’t have the time to cook and peel fresh chestnuts, you can find them already prepared in jars and vacuum-sealed packages. Avoid the canned chestnuts packed in water–they simply don’t have the alluring taste and texture of vacuum-packed chestnuts.

This scrumptious stuffing, replete with chestnuts, is so fruity and ravishing, it makes a delicious meal by itself. Enjoy it as a side dish or use it to stuff acorn, butternut, or delicata squash.

For convenience, prepare the stuffing a day ahead, and warm it for 10 to 15 minutes in a preheated 350-degree F. oven before serving. If you use fresh chestnuts in the shell, cook and peel them in advance also, to bring this recipe together more easily.

This tasty stuffing recipe is very copious so there will most likely be leftovers that can easily be covered with aluminum foil and reheated. For a small family gathering, you might want to cut the recipe in half.

Vegan Holidays lowresOh, and by the way, this delicious recipe is from my Vegan for the Holidays Cookbook!

SAVORY CHESTNUT AND FRUIT STUFFING


Yield: 12 to 15 hearty servings

2 cups water

2/3 cup pearl barley

1 1/2 teaspoons salt, divided

8 cups whole wheat bread cubes

2 1/2 cups vegetable broth

3 large sweet onions, chopped

2 stalks celery, chopped

2 large apples, cored and chopped

1 1/4 cups chopped cooked and peeled chestnuts, or pecans, or walnuts

1 cup golden raisins

3/4 cup sweetened dried cranberries

3/4 cup chopped dried apricots (preferably Turkish)

1 teaspoon ground cinnamon

1/2 teaspoon ground nutmeg

1/2 teaspoon ground pepper

2 tablespoons white miso

Garnishes

1/4 bunch parsley

3 tangerine wedges or Fuyu persimmon slices

3 fresh cranberries

1/4 cup pomegranate seeds

1/4 cup chopped parsley

  1. Preheat the oven to 350 degrees F.
  1. Combine the water, barley, and 3/4 teaspoon of the salt in a 2-quart saucepan. Cover and bring to a boil over high heat. Decrease the heat to low and simmer for 50 to 60 minutes, or until the barley is tender and all the water is absorbed.
  1. Meanwhile, place the bread cubes on a large, rimmed baking sheet. Bake for 10 to 12 minutes, or until dry. Transfer the bread cubes to an extra-large bowl.
  1. Add the vegetable broth to the bread cubes and mix vigorously with a wooden spoon until the bread cubes are broken down into a coarse meal. Set aside.
  1. Combine the onions and celery in a large, deep skillet and add 2 or 3 tablespoons of water. Cook and stir for 10 to 12 minutes, or until the onions are very soft and translucent. Add 1 or more tablespoons of water as needed to cook the vegetables and prevent burning. Transfer the onion mixture to the bowl with the bread cubes.
  1. Add the apples, chestnuts, raisins, cranberries, apricots, cinnamon, nutmeg, pepper, cooked barley, and the remaining 3/4 teaspoon salt and mix well.
  1. Thin the miso with about 3 tablespoons of water, add it to the stuffing mixture and combine well to distribute it evenly. Adjust the seasonings.
  1. Spoon the stuffing into a 13 x 9-inch baking pan, cover with aluminum foil and bake for 35 minutes. Remove the foil and bake another 15 to 20 minutes, or until a light crust forms on the top.
  1. To serve, garnish one corner of the pan with the parsley and artfully nestle the tangerine wedges and cranberries into the parsley. Sprinkle the pomegranate seeds over the top, along with the chopped parsley.

Santa Put Candy Canes into My Salad!!!!

CANDY CANE SALAD

It doesn’t take much to inspire me into playing with my food. But there’s something curious about the holiday season –can’t quite put my finger on it– but I’m just plum nuts about this time of year and the brilliant colors I see everywhere–from holiday decorations, wrapping papers and ribbons to the dazzling foods I find at the farmers’ markets.

This season just makes me tingle with joy and urges me to spend extra time in my favorite niche, the kitchen, quietly creating a little of this or that. Sometimes I have an image in my mind about how a dish ought to look, or perhaps I focus on the flavor I’m aiming for.

Candy Cane Salad 2In the case of this cheery salad, the final dish didn’t even come close to what I had pictured. I was aiming for a salad of stripes just like a candy cane but found it absolutely didn’t work in a bowl.

I set that idea aside and will definitely take another stab at it, because it simply won’t let go of me.

In my next attempt, I created a bed of greens and then, aimed for the bright reds and whites of a candy cane. The salad is still a work in progress, but for now, it makes me smile and I can almost hear it singing “Here comes Santa Claus, here comes Santa . . .” Next time, I just might crush one half of a candy cane and toss it in to get that nice, sweet, minty accent.

You can make the salad a day in advance (don’t toss it), cover it well with plastic wrap, and refrigerate it. Bring it to the table before tossing it so you can show off it’s glistening colors.

Enjoy it with your favorite dressing. Some have a preference for a light oil and vinegar dressing, but my favorite for this salad is a thick, creamy white, savory dressing!

Candy Cane SaladCANDY CANE SALAD

Yield: 8 to 10 servings

1 head romaine, torn into bite size pieces

1/2 head red leaf lettuce, torn into bite-size peices

3 leaves kale, torn into bite-size pieces

1 bunch mint, chopped


1 bunch green onions, chopped


1 small head cauliflower, finely chopped

1 small jicama, peeled and cut into 1/4-inch dice

1 bunch radishes, sliced

1 large pomegranate, seeded, 1/4 cup reserved for garnish

1 red bell pepper, diced

1/2 cup pine nuts

1 cup cherry or grape tomatoes, for garnish

  1. In an extra large salad bowl, combine the romaine, red leaf lettuce, kale, and mint. Set aside.
  2. Chop the green onions. Add the green portion to the lettuces and mix well to distribute the ingredients evenly. Spread the lettuces to the edges of the bowl, creating a slight well in the center.
  3. Put the white portion of the green onions into another large bowl.
  4. Add the cauliflower, jicama, radishes, pomegranate, red bell pepper, and pine nuts to the white portion of chopped green onions and mix well.
  5. Spoon this colorful mixture into the center of the lettuces and garnish with the cherry tomatoes around the edges and reserved pomegranate seeds in the center.