ANYONE READY FOR DESSERT?

CINNAMON PEANUT BUTTER TORTE

You’ve planned a delicious appetizer for your holiday gathering and decided the entrée will be a savory dish–a cherished old family favorite. You’ve added a few well-loved side dishes and everyone’s favorite roasted potatoes. Now, what to do for an awesome dessert that doesn’t take too much fussing, yet looks sensational?

Here’s what I noticed over the years after preparing and serving many a holiday dinner: The appetizers and entrée may be exceptional, and perhaps even lavish, but most likely it’s the dessert that everyone remembers. And it’s no surprise–sweet memories linger longer.

If you loved peanut butter since you were a kid and could never get enough of it, you’ll 
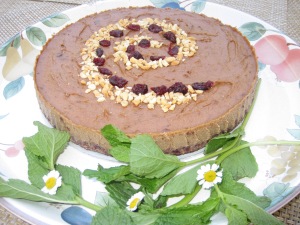
find this well-endowed peanut butter torte easy to ravish. This torte is deliriously rich in flavor, densely packed with peanut butter, and perfectly accented with cinnamon to bring out its sweetness. The list of ingredients in this dessert relies mostly on simple, whole foods, yet, the dessert gives the impression of a much more complex preparation.

The bonus for the host is that this tantalizing treat can be prepared several days ahead and left in the freezer until shortly before serving. That’s such a bonus for a crazy-busy holiday season when you really don’t have lots of time to spend on each course. I consider it a blessing when I can make the dessert well ahead and tuck it out of site until serving time.

CINNAMON PEANUT BUTTER TORTE

Yield: 10 to 12 servings

Crust

1 1/2 cups whole almonds

1 1/2 cups sweetened dried cranberries

4 to 5 tablespoons water


Filling

1 1/3 cups pitted dates, snipped in half

1 cup smooth or chunky unsalted peanut butter

3/4 cup well-mashed firm tofu

1/2 cup unsweetened soy milk

1/4 cup organic sugar

2 teaspoons ground cinnamon

1/2 teaspoon vanilla extract


Garnish

2 tablespoons sweetened dried cranberries

1 tablespoon coarsely ground dry-roasted unsalted peanuts

6 to 8 sprigs fresh min

TO MAKE THE CRUST, cover the base of a 9-inch springform pan with a piece of parchment paper 2 inches larger. Snap the collar back onto the base, and cut off the excess paper with scissors. Lightly oil the sides of the pan and set aside.

Put the almonds into the food processor and process until they become a coarse, slightly chunky meal.

Add the cranberries and water and pulse and process until the cranberries are broken down into tiny bits and the mixture holds together when gently pressed. You may have to stop occasionally to scrape down the work bowl. Spoon the crust mixture into the bottom of the springform pan and press the mixture firmly with the back of a spoon to distribute it evenly. Set aside and wash and dry the work bowl.

TO MAKE THE FILLING, put the dates, peanut butter, tofu, soy milk, sugar, cinnamon, and vanilla extract in the food processor. Process until the mixture is smooth and creamy.

Transfer the filling to the springform pan, and use a rubber spatula to spread the filling evenly over the crust.

Sprinkle the cranberries and peanuts over top and gently press them into the surface. If desired, sprinkle them in a design of your choosing. Freeze the torte until firm, about 8 to 12 hours. Remove it from the freezer about 10 to 15 minutes before serving.

TO SERVE THE TORTE, run a knife around the edge of the pan to loosen the torte. Place the pan on a large serving platter. Carefully lift off the collar. Decorate the platter with the mint and cut the torte into wedges.


THE PERFECT ICE-BREAKER–A HOT BUBBLING APPETIZER!

Tomatoes overGARLIC TOMATOES AND SNOW MOUNTAIN

Who doesn’t welcome a warming, savory appetizer that invites the guests to “play in the pool” together! The perfect icebreaker and conversation starter for a holiday gathering, this dish urges everyone to dip chunks of sourdough bread into the steaming hot dish together. As the first dipper, you may need to demonstrate how to scoop some of the Garlic Tomato Sauce along with the Snow Mountain onto the bread. For squeamish dippers, providing spoons or spreading knives might make them more comfortable and is definitely less messy.

And don’t forget to provide plenty of napkins–this well-seasoned appetizer is outrageously delicious and lots of fun with everyone plunging into the bowl for the next bite–but it can also be a bit drippy.

This tangy and very winning appetizer is ideal for those extra-special times when you want to present a starter that stands apart. This is not one of those dishes everyone has in their repertoire–but you might be the first one to introduce it to your friends and family.

Party hosts love this recipe because it’s a delicious, make-head dish and can be prepared in three convenient stages: making the Garlic Tomatoes, preparing the Snow Mountain, and heating the dish just before serving).

All this starter needs is a basket of dipping breads like chunks of sourdough, soft or toasted whole-grain pita wedges, quartered toasted whole-grain bread, baked corn chips, or toasted cocktail breads. I think sourdough bread makes one of the tastiest bases for this sumptuous appetizer, but other choices are equally as good.

Here’s the process in a nutshell: Chop tomatoes, onions, and garlic. Cook them with herbs. Transfer them to a deep dish pie plate and set aside. Make the snow mountain. Spoon it into the pie plate. Cover and refrigerate until serving time. Heat in the oven until bubbling and serve.

Tomato Ingredients

Tomatoes cooking

Herbs for seasoning

Tofu

Refrig appetizer

Tomatoes finishedIn addition to making a delightful appetizer, you might consider turning Garlic Tomatoes and Snow Mountain into a light lunch or dinner by providing a hearty salad before serving the bubbling starter. This is one of those dishes that’s really handy to have ready-made in your refrigerator when you’re busy shopping for holiday gifts, attending festive events, or rushing to the airport for out of town guests.

A NOTE ABOUT SEASONING DISHES IN GENERAL: I noticed that when I add salt at the end of cooking, the dish requires much less of the salt to bring up the flavor. This is especially true of tomato dishes that already contribute a rich, umami flavor–even without salt.

GARLIC TOMATOES AND SNOW MOUNTAIN

Yield: 10 to 12 servings as a starter or 5 to 6 as a light lunch or dinner

Garlic Tomatoes

2 1/2 pounds Roma tomatoes, chopped

2 large onions, choppedTomato Ingredients

7 to 8 cloves garlic, crushed

1/2 teaspoon dried thyme

1/2 teaspoon dried oregano

1/2 teaspoon dried basil

1/2 to 3/4 teaspoon salt

Snow Mountain

1 pound firm or extra firm tofu

1 tablespoon fresh lemon juiceTofu

1 tablespoon plus 1/4 teaspoon rice vinegar

2 large garlic cloves

3/4 teaspoon salt

3/4 teaspoon ground coriander

1/2 teaspoon plus 1/8 teaspoon dill weed

1/2 teaspoon onion powderTomatoes over

1/4 teaspoon ground black pepper

Garnish

Paprika

1 sprig fresh herbs (basil, mint, cilantro

  1. Have ready a 9- or 10-inch, deep-dish, heat-proof pie plate or an 8-inch square baking dish.
  2. TO MAKE THE GARLIC TOMATOES, combine the tomatoes and onions in a large, deep skillet and cook over high heat for 5 minutes, stirring frequently.
  3. Reduce the heat to medium and add the garlic, thyme, oregano, and basil. Stirring frequently, cook about 20 minutes, or until the tomatoes and onions are broken down, the liquid evaporated, and the sauce is thickened and chunky.
  4. Add the salt and mix well. Adjust the seasonings, if needed. Transfer the garlic tomatoes to the pie plate, and set aside.
  5. TO MAKE THE SNOW MOUNTAIN, drain and rinse the tofu, break it into pieces, and put it in a food processor. Add the lemon juice, vinegar, garlic, salt, coriander, dill weed, onion powder, and pepper and process until smooth and creamy.
  6. Spoon the tofu mountain into the center of the garlic tomatoes, forming a tall mound. Garnish with a sprinkle of parsley and place the herb sprig at the top of Snow Mountain. At this point you can refrigerate the appetizer until shortly before serving.
  7. PREPARE THE APPETIZER FOR SERVING: Preheat the oven to 350 degrees F. If you’re serving the dish shortly after preparing it, put the pie plate on a large, rimmed baking sheet for easy handling. Tuck the appetizer into the oven for 15 to 20 minutes, or until the mixture is bubbling.
  8. Remove from the oven, sprinkle very lightly with paprika, and add the fresh herb sprig. Bring the bubbling appetizer to the table and set it on a trivet–and don’t forget the dipping breads!

Important:

If you’ve prepared the dish in advance and have chilled it, bring it out of the fridge about 2 or 3 hours before serving. Then pop it into the preheated oven.

If you’re taking it right from the fridge and want to heat it, put it on a baking sheet and pop it in a cold oven. Set the temperature to 400 degrees F. and warm for about 20 to 25 minutes, or until it is bubbling. Refrigerated, the leftovers keep well for up to 5 days.

Tomatoes finished

A HOLIDAY CELEBRATION ON A PLATE!!!!

Jolly Green Christmas Tree4JOLLY GREEN CHRISTMAS TREE

This alluring, easy-as-pie appetizer recipe has a way of putting everyone into a festive mood and quickly attracting guests to the holiday table to scramble for a taste! And there are infinite ways to decorate the tree, while having fun.

Choose bright colored veggies and cut them into different shapes and sizes to create thisVegan Holidays highres very flavorful starter. Because people come to a holiday gathering ravenously hungry, they’ll appreciate this ready-to- serve appetizer that can be prepared several hours ahead or even a day ahead. The recipe comes from my Vegan for the Holidays cookbook.

If you have children who love to participate in the kitchen, create the basic green pea recipe and form it into a tree shape. Then, chop up a pile of bright colored veggies and let the kids have at it. You might be surprised at the unbridled creativity, while it keeps their eager little hands occupied for quite some time.

Of course, you can always choose to be the tree decorator and give the kids another task. This tasty holiday appetizer puts yuletide spirit on a plate and unveils your hidden talent as a sculptor and artist. Using nothing more than a spoon, you’ll be able to turn this delicious dip into a dazzling sculpted Christmas tree or even a Christmas wreath that flaunts colorful ornaments you can eat. Make it mildly spiced or crank it up to muy picante with extra jalapeno chiles and a pinch of cayenne.

Bowl Pea DipNot feeling artistic? No problem. Make the pea dip mixture in the food processor, then, simply spoon it into an attractive serving bowl. Sprinkle the top with some of the chopped veggies  and serve with the crackers on the side.

Below are some students’ photos of the Jolly Green Christmas Tree taken at cooking classes I teach throughout Los Angeles.

JOLLY GREEN CHRISTMAS TREE

Yield: 8 to 10 servingsSimple Xmas Tree

Christmas Tree Dip

1 pound frozen peas, thawed

1 (15-ounce) can cannellini or Great Northern beans, drained and rinsed

1/2 cup coarsely chopped fresh mint leaves

2 tablespoons organic sugar

2 tablespoons freshly squeezed lime juice

1/2 to 1 jalapeno chile, seeded and coarsely chopped

1 teaspoon salt

3/4 teaspoon chipotle chili powderMessy Xmas tree

1/2 teaspoon garlic powder

1/2 teaspoon onion powder

1/4 teaspoon chili powder

Pinch cayenne (optional)


Ornaments

1/4 red bell pepper, finely diced

1 carrot, half sliced and half finely dicedCrazy Xmas tree

1/2 cup pomegranate seeds

1 jalapeno pepper, sliced crosswise

1 green onion, white and green parts sliced

1 whole star anise, or 6 whole cloves

Fresh herbs (mint, cilantro, parsley)

  1. Put the dip ingredients in a food processor. Process until smooth and creamy, stopping occasionally to scrape down the work bowl.
  2. Spoon the mixture onto a large platter and use the back of a spoon to form the mixture into the shape of a large Christmas tree. Decorate the tree with wild abandon, using the bell pepper, carrot, green onion, etc. Place the star anise at the top or arrange the cloves into a radiating star, or use herbs at the top. Serve with baked tortilla chips, bean chips, toasted pita wedges, or your favorite crackers.

A Delicious Edible Wreath!

CHRISTMAS CARROT WREATH

Christmas Carrot Wreath2Something about the holiday season stirs up the creative juices and urges us to put extra energy into meals we prepare to celebrate with family and friends. On the one hand, we must admit we love the praise that comes when someone says, “Wow! That looks great!” It says others recognize  we’ve put a little extra love into the dish because we wanted to bring  something special to the table.

On the other hand, we simply love the process of creativity and thoroughly enjoy puttering in the kitchen to come up with a dish that’s our very own creation. And we don’t mind spending extra time to play with seasonings until our creation zings with flavor! Because I was so inspired by foods of the holiday season, I created my Vegan for the Holidays cookbook. This recipe is one of the tasty treasures.Vegan Holidays highres

Our final effort goes into making our masterpiece look as magnificent and enticing as it tastes–a little garnish of mint sprigs or a fluff of shredded purple cabbage, perhaps a sprinkle of ground nuts–and we’ve relished every moment spent in our favorite comfy niche, the kitchen.

The Christmas Carrot Wreath is one of those creations I envisioned. It definitely took a few tries before it came together, but it was time well spent. I learned lots in the process (we always do, don’t we?).

I’ll be playing more with the garnishing–I know that needs work. And I’ll re-post the new, enhanced photo as the season progresses. For now, enjoy the dish. It’s never failed to receive praise.

You’ll be tempted to sing “Deck the Halls” when this golden wreath comes to the table. Baked in a ring mold, this carrot dish makes a unique accompaniment to any entree. It’s deliciously moist, delicately sweet, and has a texture reminiscent of a light, airy muffin. Prepare it in advance and reheat it briefly by covering it with aluminum foil, and tucking it into a preheated 350-degree F. oven for 10 to 12 minutes.

CHRISTMAS CARROT WREATH

Yield: 6 servings

3/4 pound carrots (about 3 large), peeled and sliced

1/2 cup vanilla or plain soymilk

1 1/2 teaspoons rice vinegar, apple cider vinegar, or distilled vinegar

1/3 cup organic canola oil

1 tablespoon plus 1 teaspoon freshly squeezed lemon juice

1/2 teaspoon almond extract

1 1/4 cups whole-wheat pastry flour

1/3 cup light brown sugar, firmly packed

1 teaspoon baking powderChristmas Carrot Wreath2

1/2 teaspoon baking soda

1/2 teaspoon salt

Garnish

1 bunch parsley, cilantro, or mint

1/3 cup diced red bell pepper

2 tablespoons sliced almonds

  1. Preheat the oven to 350 degrees F. and lightly oil a 4-cup metal ring mold. Set aside.
  2. Put the carrots in a covered 2-quart saucepan with enough water to cover. Cover and bring to a boil, immediately decrease the heat to medium, and simmer for 5 minutes, or until the carrots are fork tender.
  3. Meanwhile, combine the soymilk and vinegar in a medium bowl and set aside for 5 minutes to thicken slightly. Stir in the oil, lemon juice, and almond extract; set aside.
  4. Using a slotted spoon, drain the carrots thoroughly and transfer them to a bowl. Mash them well with a fork or potato masher. Measure 1 cup of the mashed carrots and set aside. Use the remaining carrots for another recipe.
  5. Combine the flour, brown sugar, baking powder, baking soda, and salt in a large bowl and mix well.
  6. Add the mashed carrots and wet ingredients to the dry ingredients and mix thoroughly. Spoon the carrot batter into the prepared mold and bake for 25 to 30 minutes, or until a toothpick inserted into the center comes out clean. Let cool for about 10 minutes. Invert the mold onto a serving platter.
  7. To garnish, form a wreath of green herbs around the perimeter of the serving platter, if desired. Sprinkle with the diced red bell pepper and sliced almonds. Cut into portions and serve.

Note:

The ring mold I use is an old-fashioned aluminum jello mold made to look like copper. A Bundt pan or spring-form pan with a tube in the center would also work.  An angel-food cake pan might work, but it’s best to use a shallow metal mold for ease in unmolding the wreath.