ANYONE READY FOR DESSERT?

CINNAMON PEANUT BUTTER TORTE

You’ve planned a delicious appetizer for your holiday gathering and decided the entrée will be a savory dish–a cherished old family favorite. You’ve added a few well-loved side dishes and everyone’s favorite roasted potatoes. Now, what to do for an awesome dessert that doesn’t take too much fussing, yet looks sensational?

Here’s what I noticed over the years after preparing and serving many a holiday dinner: The appetizers and entrée may be exceptional, and perhaps even lavish, but most likely it’s the dessert that everyone remembers. And it’s no surprise–sweet memories linger longer.

If you loved peanut butter since you were a kid and could never get enough of it, you’ll find this well-endowed peanut butter torte easy to ravish. This torte is deliriously rich in flavor, densely packed with peanut butter, and perfectly accented with cinnamon to bring out its sweetness. The list of ingredients in this dessert relies mostly on simple, whole foods, yet, the dessert gives the impression of a much more complex preparation.

The bonus for the host is that this tantalizing treat can be prepared several days ahead and left in the freezer until shortly before serving. That’s such a bonus for a crazy-busy holiday season when you really don’t have lots of time to spend on each course. I consider it a blessing when I can make the dessert well ahead and tuck it out of site until serving time.

CINNAMON PEANUT BUTTER TORTE

Yield: 10 to 12 servings

Crust

1 1/2 cups whole almonds

1 1/2 cups sweetened dried cranberries

4 to 5 tablespoons water


Filling

1 1/3 cups pitted dates, snipped in half

1 cup smooth or chunky unsalted peanut butter

3/4 cup well-mashed firm tofu

1/2 cup unsweetened soy milk

1/4 cup organic sugar

2 teaspoons ground cinnamon

1/2 teaspoon vanilla extract


Garnish

2 tablespoons sweetened dried cranberries

1 tablespoon coarsely ground dry-roasted unsalted peanuts

6 to 8 sprigs fresh min

TO MAKE THE CRUST, cover the base of a 9-inch springform pan with a piece of parchment paper 2 inches larger. Snap the collar back onto the base, and cut off the excess paper with scissors. Lightly oil the sides of the pan and set aside.

Put the almonds into the food processor and process until they become a coarse, slightly chunky meal.

Add the cranberries and water and pulse and process until the cranberries are broken down into tiny bits and the mixture holds together when gently pressed. You may have to stop occasionally to scrape down the work bowl. Spoon the crust mixture into the bottom of the springform pan and press the mixture firmly with the back of a spoon to distribute it evenly. Set aside and wash and dry the work bowl.

TO MAKE THE FILLING, put the dates, peanut butter, tofu, soy milk, sugar, cinnamon, and vanilla extract in the food processor. Process until the mixture is smooth and creamy.

Transfer the filling to the springform pan, and use a rubber spatula to spread the filling evenly over the crust.

Sprinkle the cranberries and peanuts over top and gently press them into the surface. If desired, sprinkle them in a design of your choosing. Freeze the torte until firm, about 8 to 12 hours. Remove it from the freezer about 10 to 15 minutes before serving.

TO SERVE THE TORTE, run a knife around the edge of the pan to loosen the torte. Place the pan on a large serving platter. Carefully lift off the collar. Decorate the platter with the mint and cut the torte into wedges.


TASTE THE OMG PIE OF THE HOLIDAY SEASON!

Apricot Date Hazelnut Sticky Pie 1APRICOT, DATE, AND HAZELNUT STICKY PIE

Everyone has a favorite dessert they love to serve guests at a festive holiday meal. For some, it’s good, old-fashioned apple pie with plenty of cinnamon, for others it a rich, crunchy pecan pie. Some cling to cheesecake, while others just love a moist, two-layer dark chocolate cake topped with chocolate frosting.

For me, the OMG dessert of the season (actually, there are several) is this awesome creation I assembled and served several years ago. Everyone loved it–said it was a keeper, their favorite dessert, the best dessert they ever tasted, couldn’t get enough of it, etc.! Reviews don’t get much better than that! So, naturally, I kept it and am excited about sharing it.

Something new I can add to the list of compliments is that this dessert won 1st place in a dessert contest at Melissas.com. Actually, it was a 3-way tie for 1st place and I was one of the top three.

Sticky Pie side

For that even when I needed 30 servings, I doubled the recipe and prepared it in a 9 x 13-inch pan. I pressed only one recipe of the crust  mixture into the bottom of the pan.

Sticky Pie close up 2

So what’s the big deal–why all the fuss? It’s just simply a great tasting pie with an exceptionally appealing texture and encompasses all the good stuff the holiday season has to offer.

And, really, any time you join together dried fruit, like raisins, dates, cranberries, and apricots, you’ve combined the seductive elements of an exceptional sweet treat. But, then, mingle the merry makings of those four fruits with the crunchy, roasted, chunky nuts, spice them up, bind them with a magical medley of sweeteners, and voila!–a stunning pie for the festive holiday!

The pleasantly chewy texture of the pie is reminiscent of nougat, so be sure to use a firm, serrated knife to cut into servings. You’ll need to apply a little muscle when cutting into the pie because of its very firm, and rather sticky nature. It’s quite sweet and rich, so thin slices are best–and that makes the dessert go a little farther.

I’ve actually gotten 12 serving from this pie for several reasons. First, after a large meal, the guests are too full for big servings. Second, because the pie is super sweet, small servings are very satisfying. And, third, so many people are watching the waistlines, they’re happy to be served a small piece.

It’s also the perfect make-ahead dessert that keeps well in the refrigerator for up to five days. This is one dessert that’s a dinner host’s dream because there’s no last minute fuss and everyone loves it. For the best results, bring the pie to room temperature before serving.

For best results, make the pie a day or two ahead, cover it with plastic wrap, and refrigerate it. Then, bring the pie to room temperature several hours before serving. Refrigerating the pie adds a touch of needed moisture, while bringing it to room temperature makes it easier to cut.

 Apricot Date Hazelnut Sticky Pie pieceAPRICOT, DATE, AND HAZELNUT STICKY PIE

 Yield: 1 (9-inch) pie; 8 to 12 servings

1 recipe Oatmeal Crumb Crust (recipe below)

1 1/2 cups blanched hazelnuts (See How to Blanch Hazelnuts)Apricot, Date, and Hazelnut Sticky Pie 2

3/4 cup toasted pecans (I used Melissa’s pecans)


1 cup golden raisins (I used Melissa’s)

3/4 cup diced dates

2/3 cup diced dried apricots (I used Melissa’s)

1/2 cup sweetened dried cranberries (I used Melissa’s)

1 1/4 teaspoons ground cinnamon

1/2 teaspoon minced orange or lemon zest

1/8 teaspoon salt


1 cup brown rice syrup

1/4 cup organic sugar

1/4 cup maple syrup

1/3 cup tapioca flour

1 tablespoon freshly squeezed lime juice

1/2 teaspoon maple extract


Prepare the Oatmeal Crumb Crust and set aside.

To make the filling, pour the blanched hazelnuts into a heavy-duty ziplock bag, place the bag on a cutting board, and use a hammer to gently break the nuts into coarse pieces. Transfer the hazelnuts to a large bowl. Break the pecans into pieces and add them to the hazelnuts.

Add the raisins, dates, apricots, cranberries, cinnamon, orange zest, and salt to the nuts and toss well to distribute the ingredients evenly.

Preheat the oven to 350 degrees F. Combine the brown rice syrup, organic sugar, and maple syrup in a 2-quart saucepan. Add the tapioca flour and stir well with a wooden spoon until the flour is completely incorporated. Set aside for 5 minutes to allow the tapioca flour to absorb some of the moisture.

Bring the syrup mixture to a boil over medium heat. Boil for 4 minutes. Remove from the heat and stir the lime juice and maple extract into the syrup mixture and mix well.

Pour the syrup into the fruit-nut mixture and stir and mix thoroughly to coat all the ingredients. (The mixture will be very thick and sticky, and combining it completely will likely take the place of your daily workout.)

Spoon the filling into the prepared crust and bake for 30 to 35 minutes. Let cool for 4 to 6 hours to set completely. To store, cover the pie with plastic wrap and refrigerate. Bring the pie to room temperature before serving.

Oatmeal Crumb Crust

 Yield: Makes 1 (9-inch) pie crust

3 cups old-fashioned rolled oats

3/4 cup walnuts

4 1/2 tablespoons canola oil

3 tablespoons organic sugar

3 tablespoons maple syrup

1 1/2 tablespoons fresh lemon juice

3/4 teaspoon salt

Pour the oats into a food processor. Pulse 15 to 20 times. Add the walnuts, oil, sugar, syrup, lemon juice, and salt. Process until the mixture becomes a fine, crumbly meal and holds together when pinched. Scrape down the workbowl as needed. If needed, add 1 tablespoon of water to help the mixture hold together.

Spoon the mixture into a 9 or 10-inch pie pan and press it firmly and evenly into the bottom and up the sides of the pan with your fingers. Press on the edges to firm.

Sticky Pie Melissa's


A COMPOTE THAT MAKES SWEET MEMORIES!

Pear Walnut Compote/Choco WafersPEAR CRANBERRY COMPOTE WITH CHOCO-WAFERS

Holiday meals, whether at home or at my grandmother’s, always concluded with a small bowl of stewed dried fruits cooked until soft and perfectly sweetened and pleasantly laced with cinnamon. It certainly wasn’t a fancy dessert, and it’s  probably one of the most unpretentious desserts one can offer guests at the end of a special celebration. Yet, the memories continue to bring sweet thoughts. When I close my eyes, I can almost taste those dried prunes, apricots, pears, and raisins and remember fondly the definitive spicy aroma of cinnamon that made me appreciate this simple homespun dessert.

Because the compote was sweet and generously spiced with cinnamon, I remembered this dessert fondly and as a kid, I always looked forward to it. It became one of those tiny little treasures I knew Grandma would bring to the table without fail.

I thought it might be lovely to pass on those memories to others with a compote that’s just as easy to make, but with something special in addition that would elevate it to become a truly elegant treat. So I began with fresh pears and fresh cranberries rather than dried and spiced it with just enough cinnamon to add that nostalgic holiday aroma. But it was still just a simple compote. What else could I do to make it really zing?

Vegan Holidays lowresVoila! Homemade Choco-Wafers turned this delicious, unpretentious compote into an elegant, alluring dessert with a built-in convenience factor. These delicious little wafers can be made several days ahead and refrigerated until ready to serve. They actually keep well for up to three months in the fridge. I might also mention this is one of the delicious holiday desserts in my Vegan for the Holidays Cookbook!

The compote can be prepared two days ahead and tucked into the fridge until dessert time. But, to make this dessert extra special and give your guests that pampered feeling, bring it to room temperature on serving day and gently warm it at 350 degrees F. for about 10 to 15 minutes just before serving.

At serving time, spoon the compote into little dessert dishes and tuck two Homemade Choco-Wafers into the dish so they stand tall. Sometimes I place the wafers on the sides and sometimes in the center. Maybe you’ll come up with an even more dramatic way of presenting this dessert–there’s plenty of room for creativity!

Pear & Walnut Compote:Choco Wafers2 copyPEAR CRANBERRY COMPOTE WITH CHOCO-WAFERS

Yield: about 6 servings

Choco-Wafers

1 cup walnutsPear Walnut Compote/Choco Wafers

1 cup pitted dates, snipped in half

1/4 cup plus 1 tablespoon water

3 tablespoons golden raisins

3 tablespoons plus 1 teaspoon unsweetened cocoa powder

Compote

2 fresh Anjou or Bosc pears, cored, quartered, and sliced

1 cup fresh cranberries

1/2 cup plus 1 tablespoons light brown sugar, firmly packed

1/3 cup black raisins

1/4 cup plus 2 tablespoons freshly squeezed lemon juice

1/2 teaspoon ground cinnamon

1/2 teaspoon vanilla extract

1/4 cup water

1 tablespoon cornstarch

3 tablespoons coarsely ground toasted, walnut, almonds, or hazelnuts, for garnish

  1. TO MAKE THE CHOCO-WAFERS, preheat the oven to 350 degrees F. Line a 17 1/2 x 12 1/2-inch rimmed baking sheet with parchment paper.
  2. Put all the wafer ingredients in a food processor. Process until all the ingredients are well incorporated, the nuts are broken down to a fine, but slightly textured meal, and the mixture reaches a very thick, finely mashed, firm consistency, stopping occasionally to scrape down the workbowl.
  3. Spoon the wafer mixture into the prepared baking sheet and use the back of the spoon to form it into a 1/4-inch thick rectangle approximately 8 inches by 9 inches.
  4. Bake for 15 to 20 minutes, or until the wafer is set and almost dry to the touch but still soft. Remove from the oven and let cool completely. It will firm as it cools. When cool, cut into 2 or 3-inch squares and set aside until ready to serve or put the squares in a ziplock bag and refrigerate.
  5. TO MAKE THE COMPOTE, combine the pears, cranberries, brown sugar, raisins, lemon juice, cinnamon, vanilla, and water in a 3 or 4-quart saucepan. Cover and bring to a boil over high heat. Immediately, decrease the heat to low, and simmer 10 minutes, or until the pears are softened.
  6. To thicken the juice in the pan, combine the cornstarch and 1 tablespoon water in a small cup or bowl and stir until smooth. Stir the paste into the simmering compote a little at a time, stirring constantly for about 1 minute, or until thickened to desired consistency.
  7. To serve, spoon the compote into small dessert dishes and garnish each with the walnuts, if desired. Tuck 2 wafers into the center or sides of the compote.

I SAID CHEEZE! AND PUMPKIN CHEEZE-CAKE APPEARED!!!!

Pumpkin Spice Cheesecake 2Recipe Below

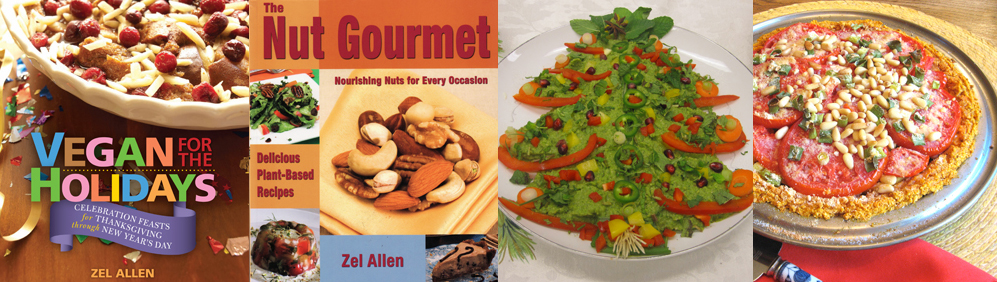
First, allow me to whet your appetite with Laura Theodore’s delicious holiday dessert- PUMPKIN SPICE CHEEZE-CAKE. The recipe is one of many luscious dishes found in Laura’s new cookbook, Vegan-ease.Vegan-Ease by Laura Theodore

Let’s Take a Peek Inside the Cookbook

Vegan-ease:

An easy guide to enjoying a plant-based diet

By Laura Theodore

Jazzy Vegetarian, LLC

Hard Cover $26.95

No, it’s not the salad dressing Vegenaise! It’s a cookbook called Vegan-ease filled with well-crafted vegan recipes that won’t keep the home cook in the kitchen for hours. Laura Theodore, the Jazzy Vegetarian, has done it again by creating a colorful and charming cookbook that will wow her many fans and draw a crowd of newcomers to the plant-based kingdom.

Many TV viewers and radio listeners know the Jazzy Vegetarian and take delight in her programs and books.

Laura’s home cooking energies took off when she moved from the scurry-flurry of New York City to a quiet country spot in New Jersey. Without the convenient, close-to-home shops of the big city, she had to be resourceful and began to create her own tasty dishes and convert non-vegetarian standards into plant-based versions. She convincingly says, “If plant-based food looks and tastes scrumptious, everyone will welcome it!”

A quick browse through her colorful new cookbook with its abundance of delightfully SQUASH LAURA ZELenticing, full-color photos is attractive enough to bring curious folks to the table–even better–maybe, even lure them into the kitchen to cook.

The author makes a strong case for going “veggie” because she knows that decision supports the environment, reduces greenhouse emissions, protects animals, and enhances the health of the human species. She stresses the “ease” in finding ingredients, preparing the dishes, and making money go further. For those new to cooking or to the vegan kitchen, she covers basic ingredients and shopping guide, kitchen tools and equipment, and nutritional benefits of a plant-based diet.

The recipe section, the main part of the book, is an adventure for the senses beginning with Fast Appetizers and Fun Beverages that introduces starters that novices can confidently prepare. Appetizers like Raw Veggie Kabobs threaded in combinations of colorful veggies on a skewer or Mini Sweet Peppers sliced in half lengthwise and stuffed with Hummus appeal to experienced cooks, too.

Breakfast dishes like Oat and Blueberry Breakfast Cake and Spinach-Tomato Vegan Omelet are so eye appealing they sell themselves and the enticing Muffins, Quick Breads, and Baked Delights are seductive. The beautiful Giant Cookie-Coffee Cake, studded with chocolate chips and chopped walnuts, is perfect for breakfast or brunch guests with its hearty base of rolled oats, bananas, and whole wheat flour. If not that recipe, then perhaps bake the Walnut-Orange Quick Bread with its rich, dark color and spiced whole-grain ingredients.

The Quick Sweet Potato Soup is definitely quick to fix with its bright chunks of sweet potatoes, celery, and cabbage. The Quick Red Lentil Curry Soup is truly vegan-ease where everything is added to the soup pot at once and simmered until the veggies are tender. Both make delicious and satisfying meals during cold-weather season along with the remaining eight recipes in the Soup section.

Vegan-ease is filled with an abundance of mouth-watering salads, dressings, pastas with flair, creative pizzas, and innovative main dishes that become a feast for the eyes. The beautiful Oven “Fried Rice” Casserole, for example, lets the oven do most of the work.

 The dessert section is divided into two parts–first come the “easiest desserts ever” like mousse, puddings, bars, and cookies followed by Fancy Finishes with fussier sweets like Blueberry Cheeze-Cake Squares and Lemon “Buttermilk” Cake with Maple Glaze.

Stress-free Holiday Recipes include all categories featuring breakfast items, soups, salads, mains, and desserts and bring the book to conclusion with menu-planning tips and a dozen special-occasion menus comprised of recipes in the book.

Vegan-ease succeeds in making vegan cooking uncomplicated. Novice cooks and old timers will find this compendium of recipes an inspiration for making colorful and tasty meals.

 Laura Theodore is truly a master of making home cooking easy on the cook, yet she doesn’t shortchange on featuring wholesome, unprocessed ingredients. Throughout the pages are simple-to-make recipes perfect for everyday meals and slightly fussier dishes for company or holiday feasting with a bright splash of color.

About Laura

Laura Theodore is an award-winning jazz singer and songwriter and actor who became interested in vegetarian cooking over 20 years ago. She is the on-camera host and co-producer of the Jazzy Vegetarian Cooking Show on PBS, a show in its third season where she dishes up gorgeous plant-based recipes. Laura also hosts a weekly podcast radio show, Jazzy Vegetarian Radio on Blogtalkradio, sharing tips, recipes, and celebrity interviews with a touch of upbeat jazzy music to give it verve.

Laura is the author of exceptional cookbooks; Jazzy Vegetarian and Jazzy Vegetarian Classics that contain recipes featured on the Jazzy Vegetarian Television Show. She shares a delicious holiday-ready Pumpkin Cheeze-Cake recipe from her new cookbook Laura Theodore’s Vegahn-ese. The beautiful cookbooks are truly a feast for the eyes with a blast of full-color photos, jazzy tips, and menu plans.

To discover more information about Laura’s television show, radio podcasts, recipes, and cookbooks visit http://www.jazzyvegetarian.com.

Pumpkin Spice Cheesecake 2

PUMPKIN SPICE CHEEZE-CAKE

Makes 8 to 10 servings / Ease Factor 3

This delicate yet rich-tasting cake makes the perfect dessert for any winter holiday event. Served with a generous dollop of Vegan Whipped Topping (page 201), this cheeze-cake will be dressed to impress!

CRUST

1¾ cups cookie crumbs (ginger cookies work well)

¼ cup vegan margarine, melted

FILLING

2 tablespoons rolled oats

14 to 16 ounces firm regular tofu

1 can (about 16 ounces) unsweetened pumpkin purée

2⁄3 cup dark brown sugarPumpkin Spice Cheesecake 1

1 teaspoon vanilla extract

1 teaspoon ground cinnamon

¼ teaspoon allspice

TOPPING

3 tablespoons cookie crumbs

Preheat the oven to 350 degrees F. Liberally coat a 10-inch round springform pan with vegan margarine.

To make the crust, put 13⁄4 cups cookie crumbs and the melted margarine in a medium-sized bowl and mix with a fork until well combined. Pat the crumbs firmly into the bottom of the prepared pan. Bake the crust for 5 minutes. Remove from the oven and let cool 5 minutes.

To make the filling, put the rolled oats in a blender and process into coarse crumbs. Add the tofu, pumpkin purée, brown sugar, vanilla extract, cinnamon and allspice and process until smooth and creamy.

Pour the filling into the crust and bake for 30 to 35 minutes, or until firm to the touch. Remove the cake from the oven and place it on a wire rack. Cool for 15 minutes, then carefully run a table knife around the perimeter of the cake to ensure it does not stick to the side of the pan.

Sprinkle 3 tablespoons of cookie crumbs evenly over the top of the cake, gently pressing them into the top, so the crumbs adhere. Release the side of the springform pan to unmold.

Cover the cake very loosely and refrigerate 3 to 24 hours before serving. Serve with Vegan Whipped Topping (page 201) on the side, if desired. Covered tightly and stored in the refrigerator, leftover cheeze-cake will keep for about 2 days.

Nutritional Analysis: Amount per serving, based on 10 servings: 154 Calories; 7g Fat; 1g Saturated fat; 5g Protein; 62mg Sodium; 20g Total Carbohydrate; 15g Sugars; 2g Fiber

Recipe © 2015 Laura Theodore, published by Jazzy Vegetarian, LLC, reprinted by permission.
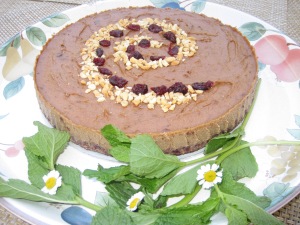
TARTS FOR DESSERT? YOU BET!!!

Raw Gingerbread Tartlet1 LR 1500px RAW GINGERBREAD AND CHOCOLATE TARTS

oliverioPlant-fueled since 2011, Annie Oliverio writes, runs, and cooks in the heart of Cattle Country. An enthusiastic “home chef,” Annie started her blog, An Unrefined Vegan, to share her passion for creating cruelty-free, unprocessed, whole food recipes that are delicious, healthful, and simple to prepare. Annie’s dishes contain little or no oil and her desserts are sweetened with fruit, dates, or stevia. It’s all about nurturing body, brain, and conscience.

Through her project, Virtual Vegan Potluck, she invites both vegan and non-vegan bloggers to share a twice-yearly online potluck, demonstrating how food can bring people together. Annie is currently writing and photographing her first cookbook, crave/eat/heal.

She has been fortunate to have as participants, cookbook authors Kathy Hester, Robin Robertson, Natalie Slater, Ellen Jaffe Jones, and Bryanna Clark Grogan. Read more about that event on her website, Virtual Vegan Potluck. Annie is also a recipe contributor to One Green Planet and a featured chef on Raw Food Recipes.

 RAW GINGERBREAD AND CHOCOLATE TARTS

 Makes 9

Crust:
1/2 cup pecans

1 tbsp. crystallized ginger
1 tbsp. cacao or cocoa powderRaw Gingerbread Tartlet3 750px LR
1 tbsp. chia seeds
1/4 cup unsweetened coconut flakes
4 dates, chopped
1 tsp. dried ginger
1 tbsp. water

Chocolate layer:
4 tbsp. low-fat coconut milk
1 tbsp. cacao or cocoa powder
1 tsp. agave nectar
4 tbsp. vegan semi-sweet chocolate chips

Filling:
1 banana, cut into chunks
1 cup cashews, soaked for a few hours, drained & rinsed
1/8 cup molasses
3 tbsp. low-fat coconut milk
2 tsp. vanilla extract
1 tbsp. coconut oil, melted
1/2 tsp. powdered ginger
1/2 tsp. cinnamon
1/8 tsp. allspice
pinch ground cloves

~18 thin strips of crystallized ginger, for decoration
9 whole pecans, for decoration

Make the crust:
Have a 12-cup muffin pan at the ready.

In a food processor, combine the pecans, ginger, cacao powder, chia seeds, coconut flakes, dates, and dried ginger. Process until the nuts and dates are broken down into very small pieces. Add the water and process until the mixture starts to come together. The mixture should stick together when pinched.

Put 1 tbsp. of the mixture into each of 9 muffin cups. (You could probably eke out 10…) Press the crust firmly and uniformly down into each tin. Set aside while you prepare the chocolate layer.

Make the chocolate layer:
In a small saucepan, combine all of the ingredients and melt over medium heat. This does not take long – so watch carefully so you don’t burn the chocolate. Whisk to thoroughly combine, then remove from the heat. Carefully pour the chocolate over the crust. Tap and tip the pan so that the chocolate completely coats the crusts. Place pan in the freezer while you prepare the filling.

Make the filling:
In a high-speed blender, combine the banana, cashews, molasses, coconut milk, vanilla extract, coconut oil, and spices and process until very smooth. You’ll need to tamp it down a few times to get a really smooth mixture. You want it silky with no little chunks of cashews. You can do this in a food processor, but it takes a long time and you won’t get that silky smoothness.

Once the filling is smooth, scrape it into a small bowl. This just makes working with it a little easier. Remove the muffin pan from the freezer and divide the filling between the cups. Place two strips of crystallized ginger on each tart and gently press in one pecan per tart. Refrigerate for several hours.

Vegan Porcupine For Dessert. Yum!

Polenta PorcupinePOLENTA PORCUPINE PIE

I’ve only encountered polenta in a savory form, usually served as a side dish. But I often wondered if it would be possible to turn it into a delicious, gluten-free dessert. And with the wonderful array of freshly dried fruits available throughout the season, I began to ponder how I could incorporate the two ideas–polenta and dried fruits.

Well, the best way to bring an idea into fruition is to just plunge in when the opportunity of time and need arises, and indeed it did.

When a friend invited me for dinner and asked me to bring dessert, she created that perfect momentum for a wildly  new experiment. I decided to make the dessert polenta with the dried fruits I had on hand. For color, I tossed in some carrots that I shredded on the coarse side of the grater. And for texture, I thought pine nuts might be a nice contribution.

To sweeten this little gem I prepared a simple date paste in the food processor. And to make the polenta a little more like a holiday dessert, I added cinnamon, cardamom, and a touch of cloves.

Porcupine moldAfter combining all the ingredients, I pressed the mixture into a large, shallow jello mold about 10 inches in diameter and spread it to the edges to avoid any holes and air spaces. Then I chilled it in the fridge and began to think about how I would garnish it. At that point, the porcupine idea hadn’t occurred.

Shortly before leaving for my friend’s house, I unmolded the polenta onto a huge platter that would fit the mold. I stared at it for a few minutes, pondering some sort of topping to bring it to life. And then that magic aha bell went off and I reached for the almonds.

I poked in a few of the almonds–it didn’t look like much, so I kept going until it took on that finished appearance. Don’t ask how I knew it was finished–I think we kitchen elves just know when something looks pleasing to the eye. The final touch was a flower or two from the garden and then, it was done!

It was a delicious surprise that also looked wonderfully enticing. When my friend asked what to call this dessert, I hesitated only a moment–and out popped the amusing name. Because of the bounty of fruits, small servings make this dessert go a long way. I cut the “pie” into thin wedges and on that day I squeezed 16 servings out of it.

Polenta PorcupinePOLENTA PORCUPINE PIE

Yield: 10 to 12 servings

Fruit Mix

1 large carrot, peeled and coarsely shredded

3/4 cup golden raisins

3/4 cup black raisins

1/3 cup diced dried Turkish apricots

1/4 cup pine nuts

Date Paste

2 cups pitted dates, snipped in half and lightly packed

1/2 cup water

Polenta

4 cups water

1 teaspoon ground cinnamon

1/4 teaspoon ground cardamom

1/4 teaspoon ground cloves

1/4 teaspoon salt

1 cup coarse whole grain cornmeal


1/2 cup whole almonds

  1. Line a large, shallow mold, about 9 to 11 inches in diameter, or a 2-quart ring mold with plastic wrap large enough to drape over the sides and set aside.
  2. To make the fruit mix, combine the carrots, golden and black raisins, apricots, and pine nuts in a medium bowl and set aside.
  3. TO MAKE THE DATE PASTE, put the dates in a food processor. With the machine running, add the water and process until smooth. Stop the machine occasionally to scrape down the sides of the workbowl. Measure 1 cup of the date paste and set it aside for the recipe. Save the remainder for another use.
  4. TO MAKE THE POLENTA, put the water, cinnamon, cardamom, cloves, and salt in a 4-quart saucepan. Cover the pan and bring to a boil over high heat.
  5. Add the cornmeal and return the mixture to a boil, stirring with a whisk. Reduce the heat to medium-high and cook, uncovered, for about 10 minutes, stirring frequently.
  6. Add the reserved date paste and mix well with a wooden spoon to incorporate it thoroughly. The mixture will become very thick.
  7. Add the fruit mixture a little at a time, stirring continuously, until well mixed.
  8. Working quickly, spoon the mixture into the prepared mold and spread it to the edges. Let cool completely and cover with plastic wrap. Refrigerate for 8 to 12 hours.
  9. Before serving, invert the polenta mixture onto a large platter and remove the plastic wrap. Poke the tips of the almonds into the top surface, gently pressing them in just enough to secure them.

Note:

Commercially packaged pitted dates, may contain one or two date pits that have evaded the pitting machinery. To avoid damaging the food processor blade, use a kitchen scissors to snip the dates in half before adding them to the processor. The date paste makes about 1 1/3 cups.