CELEBRATE A WHITE CHRISTMAS AT THE TABLE

WHITE CHRISTMAS TRIO WITH SAVORY WALNUT SAUCE

A beautiful main dish, this trio features a tasty grain as the base, topped with a hearty serving of vegetables. The final topping is a snowy white, ultra creamy walnut sauce garnished with fresh pomegranate seeds and a sprinkle of parsley.

While it looks complicated, it’s really quite manageable with good planning. The bulgur, vegetables, and the sauce can each be made a day ahead and stored in a container that can be gently warmed in the oven. You don’t even have to warm the sauce–just enjoy it at room temperature and it will be delightfully creamy and delicious.

This is a fun dish to serve because it lends itself to inventively creative presentations. Assembling the dish will tap into your innovative notions and allow you go be as expressive as your inner artist allows. If you prefer simplicity, that’s totally OK and your family will still enjoy a luscious and healthy whole grain dish complete with vegetables and a unique, walnut-based sauce that’s white as snow to top off the White Christmas Trio.

To fill out the meal, I would also add legumes, a side vegetable, and a gorgeous salad. Of course, a delicious appetizer makes a great start to the festivities. Perhaps the Yin Yang Thanksgiving Paté. A lighter choice might be the Smoky Garlic Stuffed Endive. I’ve posted some fun choices for your holiday dessert and will let you explore the many recipes by clicking on Desserts.

WHITE CHRISTMAS TRIO WITH SAVORY WALNUT SAUCE

Yield: 6 to 8 servings

Bulgur Wheat

1 1/2 cups coarse bulgur wheat or Basmati brown rice

3 cups water

1 1/2 teaspoons salt

1/3 cup raisins

Walnut Sauce

3 cups walnuts

3 cups vanilla soymilk

1 to 2 tablespoons nutritional yeast

1 teaspoon salt, or to taste

1/2 teaspoon organic sugar

1/4 teaspoon pepper

Pinch cayenne (optional)

Vegetables

2 large carrots, coarsely grated

2 large zucchini squashes, coarsely grated

1 large yellow summer squash, coarsely grated

1 medium onion, chopped

2 tablespoons water

1 tablespoon extra virgin olive oil

2 cloves garlic, thinly sliced, crosswise

1/2 teaspoon oregano

1/2 teaspoon basil

1/2 teaspoon marjoram

1/2 to 1 teaspoon salt or to taste

Freshly ground black pepper

Juice of 1/2 lemon

Garnish

1/2 to 3/4 cup pomegranate seeds

2 tablespoons finely chopped parsley

TO MAKE THE BULGUR WHEAT, combine the bulgur, water, and salt in a 2-quart saucepan. Cover, and bring to a boil over high heat. Reduce the heat to low, and steam for 12 to 15 minutes (steam Basmati brown rice 35 to 45 minutes, or until tender).

Put the raisins in a small bowl and cover with hot water. Set aside to plump them while preparing the remaining ingredients.

TO MAKE THE WALNUT SAUCE, put the walnuts, soymilk, nutritional yeast, salt, pepper, and sugar in a blender. Process until smooth and creamy. Adjust seasonings as needed. The sauce will thicken when standing. Set aside in a saucepan and warm gently before serving.

TO MAKE THE VEGETABLES, combine the carrots, zucchini, yellow squash, onions, water, olive oil, garlic, oregano, basil, marjoram, salt and pepper in a large deep skillet. Cook and stir over medium-high heat until the vegetables are soft, about 5 to 7 minutes. Add 1 or more tablespoons of water as needed to prevent burning the vegetables. Adjust seasonings and add lemon juice to taste.

Drain the water from the reserved raisins and add them to the vegetables and toss well.

TO ASSEMBLE THE DISH:

  • Mound the bulgur wheat onto a large serving platter.
  • Spoon some of the walnut sauce over the bulgur, leaving a 1-inch border of the bulgur showing.
  • Form a ring of the cooked vegetables, leaving a 1-inch border of bulgur wheat around the edges.
  • Finish with a sprinkle of pomegranate seeds and parsley over the top.
  • Serve the remainder of the walnut sauce on the side.

Beets Never Tasted this Good!

BOUND FOR GLORY BEETS

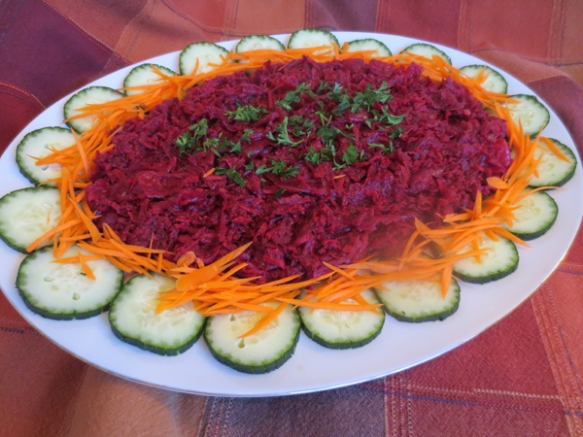
This is a charming side dish perfect for any occasion. It looks great on the buffet table but you can easily plop in into a bowl and pass it at the table. It’s so versatile you can serve it hot, cold, or room temperature so it makes the ideal prep-ahead recipe. Here’s an extra bonus–you can even make it two days ahead and it still tastes great. That means that leftovers will still be delicious the next day.

If you’ve got a crowd coming, count on this recipe to go a long way. For a small family dinner, consider cutting the recipe in half or you’ll have tons left over. Bound for Glory BeetsBecause of the unique seasonings, the beets make a tasty salad topper or even a crown for polenta, or the base of a Russian salad –you name it.

I love that this recipe comes together so quickly with the food processor playing a key role in prepping the beets and carrots. That very special appliance is truly one of the miracles of our modern day  kitchens. Our grandmothers never dreamed of such things that cold do the work of shredding and chopping in seconds.

One little heads-up: Horseradish can be brazenly spicy! Use it with moderation unless your family adores its pungent nip. I start with 1 tablespoon, mix it in well, and taste. That’s usually enough for my family. But–and this is worth noting. If the horseradish has been hanging around your fridge for some time, it has lost a good bit of its zesty nature. In that case, even two tablespoons of it might be pretty darned good. If you buy a fresh jar, though, you’ll find that even one tablespoons can clear your sinuses.

BOUND FOR GLORY BEETS

Yield: 8 to 10 servings

Beets

3 large golden or red beets (1 1/2 to 2 pounds), peeled and coarsely shredded

2 medium onions, chopped

1 large carrot, coarsely shredded

1 cup water or more as needed


Sauce

1 /4 cup plus 2 tablespoons Dijon mustard

2 tablespoons water

2 tablespoons agave nectar or maple syrup

1 to 2 tablespoons prepared non-dairy horseradish

3 tablespoons fresh chopped dill or 1 tablespoon dried dill weed


Garnish

1 cucumber, scored with fork tines, and sliced

Bound for Glory Beets 21 medium carrot, peeled and coarsely shredded or sliced into thin          matchsticks with a julienne peeler

2 to 3 tablespoons coarsely ground walnuts

2 tablespoons chopped parsley

  1. Combine the beets, onions, carrot, and water in a large, deep skillet and cook and stir over high heat for 8 to 10 minutes, or until softened and most of the water has evaporated. Add 1 or more tablespoons of water only as needed to cook the vegetables and prevent burning.
  2. While the beets are cooking, combine the Dijon mustard, water, agave nectar, horseradish, and dill in a small bowl and mix well. Decrease the heat to medium and add the Dijon mixture. Cook for 1 or 2 minutes longer, stirring well to marry the flavors.
  3. Transfer the beets to an attractive serving platter, spooning them into the center to leave a border.
  4. To garnish, surround the beets with the cucumbers. Spoon the carrots next to the beets. Sprinkle the center of the beets with the ground walnuts and sprinkle with parsley.

Alternative Serving Suggestions

Change the whole look of the dish by using beets of two colors. Cook 2 medium golden beets and 2 medium red beets separately, adding 1 onion and medium carrot each. Divide the sauce between the 2 kinds of beets and arrange them in unique ways on the platter:

  • Form the two colors in a yin-yang shape
  • Arrange the two colors side-by-side or
  • Place one color in the center of the serving platter and surround it with the other color

Ask Santa for Some Delicious Panforte for Christmas!

SANTA’S FAVORITE PANFORTE

Panforte giftsPanforte, pronounced pan for tay with an accent on the for, is an outrageously, delicious sweet and spicy fruit and nut confection that’s perfect for sharing any time of year, but it’s especially meaningful during the holiday season. Panforte originated in Italy where it became a Christmas tradition with a surprisingly long history.

Panforte in Italian means strong bread, but it isn’t bread at all–it’s actually an alluring Christmas confection with stunning eye appeal that matches its irresistible cinnamon-spiced Vegan Holidays highressweetness. Because of its seductive ability to bring extreme happiness to anyone who tastes its “nectar,” panforte seemed like a perfect addition to the Christmas chapter of Vegan for the Holidays.

Panforte, sometimes called Siena Cake, originated in the city of Siena, in the Northern Italian region known as Tuscany. Some consider Panforte a cross between fruitcake and confection. This heavenly sweet treat has been a long-standing holiday tradition in Italy that may date back to the 13th century. Originally it was made for Christmas but is now available year round.

TLC FOR SANTA’S FAVORITE PANFORTE

If you decide not to eat the confection right away, wrap it well and store it in the refrigerator. You can easily keep it up to one year in the fridge, if you choose. For best flavor and ease of cutting into serving pieces, it’s best to bring it to room temperature before serving. At room temperature, the confection will keep for several weeks, if well wrapped. In time, though, it will become very dry and difficult to chew, so it’s best to keep it refrigerated until ready to enjoy.

Panforte dusted & unwrappedTo serve the Panforte, cut it into thin wedges or into one-inch cubes. Be sure to use a very firm, heavy-duty knife because you’ll need to apply more than a little elbow grease to cut through the firm texture.

Panforte is so special it makes a Panforte cut in piecesmuch appreciated holiday gift, too. Each recipe makes four delicious panfortes that can be prepared weeks or even months in advance, double-wrapped in plastic film, and stored in the refrigerator.

If ever there was an exceptional homemade gift to give at holiday time, it’s panforte, a confection that has won over anyone who has tasted its ambrosial sweetness. To make the panforte gift-ready, wrap each one in holiday ribbon and tuck a cluster of real or plastic holly into the center.

Santa's Favorite Panforte copySANTA’S FAVORITE PANFORTE

Baked into slabs, dusted with powdered sugar, and cut into bite-sized chunks or thin wedges, these crunchy, chewy nut-and-fruit-filled nuggets make joyful treats for gifting. For convenience, keep the Panforte well wrapped in plastic and refrigerated until you’re ready to box it, wrap it, or ship it across the country. While panforte keeps at room temperature for several weeks, it just might attract ants or other critters that will think they’ve discovered sweet nirvana.

Important!: You’ll need a candy thermometer for preparing the syrup.

Yield: Makes about 20 servings

PanforteSanta's Favorite Panforte copy

2 cups pecans

1 3/4 cups walnuts

1 1/4 cups almonds

1 cup dried apricots (preferably Turkish), diced

1 cup all-purpose or whole wheat pastry flour

3/4 cup plus 2 tablespoons organic sugar

1/2 cup raisins

1/2 cup chopped dates

1/2 cup sweetened dried cranberries

2 tablespoons plus 1 12 teaspoons ground cinnamon


Syrup

1 cup agave nectar

3/4 cup plus 2 tablespoons organic sugar

1 cup powdered sugar

  1. Preheat the oven to 350 degrees F. Line four 8-inch metal or aluminum foil pie pans, or 7-inch cake pans with enough parchment paper to drape over the sides
  2. TO MAKE THE PANFORTE, spread the pecans, walnuts, and almonds on a large rimmed baking sheet and toast them for 8 minutes. Immediately transfer the nuts to Panforte gift wrapped 3a large platter to cool and decrease the oven temperature to 325 degrees F.
  3. Combine the apricots, flour, sugar, raisins, dates, cranberries, and cinnamon in an extra-large bowl. Add the cooled nuts and toss well to coat all the ingredients. Set aside.
  4. TO MAKE THE SYRUP, combine the agave nectar and organic sugar in a 2-quart saucepan and mix well. Attach the candy thermometer to the pan and place the pan over medium-high heat. Boil until the temperature reaches 230 degrees F., about 5 minutes. (this can happen very quickly.) Do not stir.
  5. Immediately pour the syrup into the fruit-nut mixture and use a heavy-duty wooden spoon to stir and coat the ingredients well. The mixture quickly becomes extremely stiff, and you’ll need to apply muscle power to combine the syrup and fruit-nut mixture thoroughly.
  6. Distribute the mixture equally among the prepared pans, placing one spoonful of the mixture in the pan at a time and packing it down before adding another. Bake for 25 to 30 minutes. Let cool completely before removing from the pans. Carefully remove the parchment paper from each slab and dust each one heavily with powdered sugar on both sides, using your hands to coat it completely. After dusting, wrap the panforte until ready to serve or gift-wrap.
  7. To serve, use a sharp, heavy-duty knife to cut the panforte into 1-inch pieces or slice into thin wedges. Wrapped in a double layer of plastic wrap at room temperature, Santa’s Favorite Panforte will keep for 3 months, or for 1 year in the refrigerator.

Santa Put Candy Canes into My Salad!!!!

CANDY CANE SALAD

It doesn’t take much to inspire me into playing with my food. But there’s something curious about the holiday season –can’t quite put my finger on it– but I’m just plum nuts about this time of year and the brilliant colors I see everywhere–from holiday decorations, wrapping papers and ribbons to the dazzling foods I find at the farmers’ markets.

This season just makes me tingle with joy and urges me to spend extra time in my favorite niche, the kitchen, quietly creating a little of this or that. Sometimes I have an image in my mind about how a dish ought to look, or perhaps I focus on the flavor I’m aiming for.

Candy Cane Salad 2In the case of this cheery salad, the final dish didn’t even come close to what I had pictured. I was aiming for a salad of stripes just like a candy cane but found it absolutely didn’t work in a bowl.

I set that idea aside and will definitely take another stab at it, because it simply won’t let go of me.

In my next attempt, I created a bed of greens and then, aimed for the bright reds and whites of a candy cane. The salad is still a work in progress, but for now, it makes me smile and I can almost hear it singing “Here comes Santa Claus, here comes Santa . . .” Next time, I just might crush one half of a candy cane and toss it in to get that nice, sweet, minty accent.

You can make the salad a day in advance (don’t toss it), cover it well with plastic wrap, and refrigerate it. Bring it to the table before tossing it so you can show off it’s glistening colors.

Enjoy it with your favorite dressing. Some have a preference for a light oil and vinegar dressing, but my favorite for this salad is a thick, creamy white, savory dressing!

Candy Cane SaladCANDY CANE SALAD

Yield: 8 to 10 servings

1 head romaine, torn into bite size pieces

1/2 head red leaf lettuce, torn into bite-size peices

3 leaves kale, torn into bite-size pieces

1 bunch mint, chopped


1 bunch green onions, chopped


1 small head cauliflower, finely chopped

1 small jicama, peeled and cut into 1/4-inch dice

1 bunch radishes, sliced

1 large pomegranate, seeded, 1/4 cup reserved for garnish

1 red bell pepper, diced

1/2 cup pine nuts

1 cup cherry or grape tomatoes, for garnish

  1. In an extra large salad bowl, combine the romaine, red leaf lettuce, kale, and mint. Set aside.
  2. Chop the green onions. Add the green portion to the lettuces and mix well to distribute the ingredients evenly. Spread the lettuces to the edges of the bowl, creating a slight well in the center.
  3. Put the white portion of the green onions into another large bowl.
  4. Add the cauliflower, jicama, radishes, pomegranate, red bell pepper, and pine nuts to the white portion of chopped green onions and mix well.
  5. Spoon this colorful mixture into the center of the lettuces and garnish with the cherry tomatoes around the edges and reserved pomegranate seeds in the center.

Almond Nutloaf, a Gorgeous Holiday Choice

 ALMOND NUTLOAF WITH TOMATO HERB GRAVY

Almond NutloafALMOND NUTLOAF WITH TOMATO HERB GRAVY

Holiday dining in a non-vegan household can often feel like choices are extremely limited. Not so if you bring this scrumptious vegan-to-the-core nutloaf to the table. Even the non-veg family and friends will be tempted to start with a sliver.

My experience in non-veg situations is that the doubting Thomases will take a teeny tiny serving at first and taste it hesitantly, half expecting to not like it. Most are taken by surprise, because the darned nutloaf tastes amazing and they like it enough to head back for a realistic serving size. It’s often the very same experience when non-vegans come to my house for a holiday meal.

Plus, what’s not to like? It looks appealing, has an pleasing nutty, crunchy texture, and has a delicious combination of flavors from the medley of herbs and spices baked into it.

In spite of the long list of ingredients and lengthy directions, the nutloaf is actually a snap to assemble. Even better is that you can make the nutloaf up to two days ahead of the holiday frenzy. I’ve even served it cold, but it’s truly much tastier enjoyed nice and warm.

To reheat the nutloaf, remove it from the refrigerator about 2 hours ahead. Preheat the oven to 350 degrees F. and cover the nutloaf with aluminum foil. Tuck it into the oven for about 15 to 25 minutes, or just until heated through.

It’s even terrific as leftovers! There are many times I’ll actually make an extra-large quantity of several dishes, just so I’ll have leftovers. Those leftovers are a blessing when you have out of town family visiting for the holidays and you’re on the run touring them all over the city. it’s so nice to come home to a meal that simply needs a few minutes to warm.

Almond Nutloaf 3I played with a little different way to garnish the nutloaf. It’s easy to make a tomato rose. All you need is a very sharp paring knife and a small tomato. Start by paring the tomato skin close to the stem end and work your way around and around cutting a thin layer of skin somewhat unevenly to create a more natural look. When you’ve pared the tomato completely, then start rolling the skin into a coil with the inner side facing outward. Secure it with a toothpick or two.

If you’re not up for the Tomato Herb Gravy, that’s OK. You don’t NEED it absolutely, but it’s really nice to have that extra little feature in a meal that adds the finishing touch. And, if you’re serving mashed potatoes, you’ll have the gravy all made.

Don’t have a springform pan? No problem. Line an 8 x 8-inch baking dish with enough parchment to drape over the edge on two opposite sides. When it’s all baked, you can lift the nutloaf by the extended parchment and transfer it to a serving platter.

I hope you’ll make this dish and send me some comments. I’d love to read about your experience.

Yield: 8 to 10 servings

1 pound Russet potatoes, unpeeled, scrubbed and coarsely cut into chunks
2 onions, coarsely chopped, divided
3 cloves garlic, coarsely choppedAlmond Nutloaf 3
2 1/4 teaspoons salt, divided
Water

2 cups whole raw almonds

1/3 cup raw walnuts
1/3 cup raw pecans

4 medium, fresh tomatoes, seeded and diced
1/2 cup matzoh meal or bread crumbs
1/4 cup tomato paste
4 cloves garlic, finely minced
1/2 teaspoon ground nutmeg
1/2 teaspoon ground cinnamon
1/4 teaspoon dried basil
1/4 teaspoon dried thyme
1/4 teaspoon dried marjoram
1/4 teaspoon ground black pepper
1 or 2 pinches cayenne (optional)

1 recipe Tomato Herb Gravy (below)

Garnish

1 or 2 medium tomatoes, diced
Fresh dill, parsley, or cilantro

  1. Preheat the oven to 375 degrees F. and remove the collar of a 9-inch springform pan. Line the bottom of with parchment cut 2 inches larger than the pan. Snap the collar back on and lightly oil the sides. Use a scissors to cut away the excess parchment. Place the pan on a large rimmed baking sheet and set aside.
  1. Put the potatoes in a 2-quart saucepan and add 1/4 of the onions. Add the garlic, 1/2 teaspoon of the salt, and water to cover. Cover the pot and bring to a boil over high heat. Decrease the heat to medium and simmer for 8 to 10 minutes or until the potatoes are fork tender.
  1. Meanwhile, put the remaining onions in a food processor and pulse-chop until they are finely minced. Transfer them to a large skillet and add about 1/4 cup of water. Cook and stir over high heat for about 5 to 7 minutes, or until softened, adding 1 or more tablespoons of water as needed to prevent burning.
  1. Put the almonds in a food processor and process until they are finely ground, yet slightly textured. Transfer them to a large bowl.
  1. Process the walnuts and pecans in the food processor until finely ground, yet slightly textured. Add them to the bowl with the almonds.
  1. Thoroughly drain the onions and potatoes in a colander. Transfer them to a medium bowl and mash them well. Then, add them to the bowl with the nuts.
  1. Add the tomatoes, matzoh meal, tomato paste, garlic, the remaining 1 3/4 teaspoons salt, nutmeg, cinnamon, basil, thyme, marjoram, pepper, and cayenne, if using. Mix the ingredients thoroughly to distribute the seasonings evenly.
  1. Spoon the mixture into the prepared springform pan, packing it firmly with a spoon or your hands to avoid air pockets.
  1. Arrange the diced tomatoes over the top and press them into the surface lightly. Bake 60 to 70 minutes or until firm when gently pressed. Remove the pan from the oven and allow it to stand for 15 to 20 minutes.
  1. To Serve, place the springform pan on a large serving platter. Loosen the edges of the nutloaf with a knife and lift off the springform collar. Garnish the platter with fresh herbs. Use a serrated knife to cut the nutloaf into serving wedges and serve the Tomato Herb Gravy on the side.

Tomato Herb Gravy

3 cups water
3 medium size Roma tomatoes, diced
2 large cloves garlic, crushed
2 teaspoons lemon juice
1/2 teaspoon onion powder

1/2 teaspoon dried rosemary leaves
1/2 teaspoon dried thyme leaves
1/2 teaspoon dried sage leaves
Salt and pepper

2 tablespoons arrowroot or cornstarch
2 tablespoons water

  1. Combine the water, tomatoes, garlic, lemon juice, and onion powder in a 2-quart saucepan.
  2. Create a bouquet garni by placing the rosemary, thyme, and sage into the center of a small piece of cheesecloth. Then gather up the ends to enclose the herbs, and tie it securely with a string. Add the bouquet garni to the saucepan and bring to a boil over high heat.
  3. Lower the heat to medium and simmer about 5 to 8 minutes. Remove the bouquet garni and discard it. Season with salt and pepper.
  4. Combine the arrowroot and water in a small cup or bowl and stir it well to form a runny paste. Add the paste to the gently simmering tomato gravy a little at a time stirring with a wire whip for about 1 minute, or until the gravy is thickened to desired consistency. Cook one minute longer and season to taste with salt and pepper. Makes about 3 1/4 cups.