NAUGHTY LITTLE NIBBLES MAKES US HAPPY!

CHOCOLATE FIREBALLS and TAHINI PEANUT CONFECTIONS

Homemade fruit and nut confections are often considered non-glamorous and too homespun by some. True, they may not be perfectly shaped and are a bit out of round, but let’s look from a different point of view. By others, they’re beloved, delicious, and most appreciated because they’ve been lovingly hand-made by someone whose desire is to bring a tasty little treat to the table or to offer as a sweet gift.

I’ve made two happily concocted confections to share on this blog–Chocolate Fireballs and Tahini Peanut Confections. Each one is vastly different from the other, yet they pair well together.
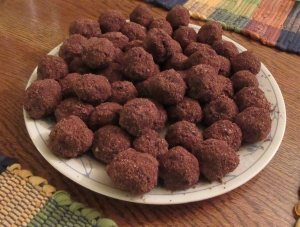
First, the Chocolate Fireballs: Most people find chocolate a total charmer. It’s no wonder–chocolate has compelling flavor that hits the tongue and totally wins you over. I say, “Go ahead–devour the chocolate!” These little treats contain no sugar, yet they’re deliciously sweet with nothing more than the earthy gifts of Mother Nature.

A little heads-up: These babies contain cayenne within the confections and also in the coating. I would judge the heat level to be between mildly spiced to just a tad more–not at the medium level, though. But, since everyone has a different spice tolerance, I thought it would be helpful to prepare you for a delightful little touch of heat and provide a little warning to those with sensitive taste buds.

If you know your guests enjoy spicy foods, say nothing and let the touch of spice be a pleasant surprise. You can enjoy watching them light up when that tiny blast of heat hits those little receivers on the tongue.
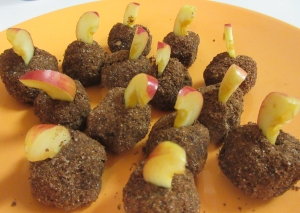
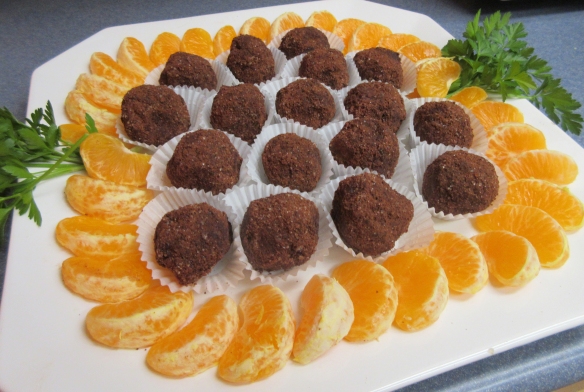
One day, when unexpected relatives dropped in for a visit, I reached into the freezer for these treats and arranged them on a dessert platter lined with a doily. Unwilling to wait for them to defrost, the cousins snapped them up and devoured them with gusto. That defining moment revealed that the confections were just as enjoyable eaten at room temperature or taken directly from the freezer. These tasty nibbles also make ideal gifts for the grandparents on your holiday list.
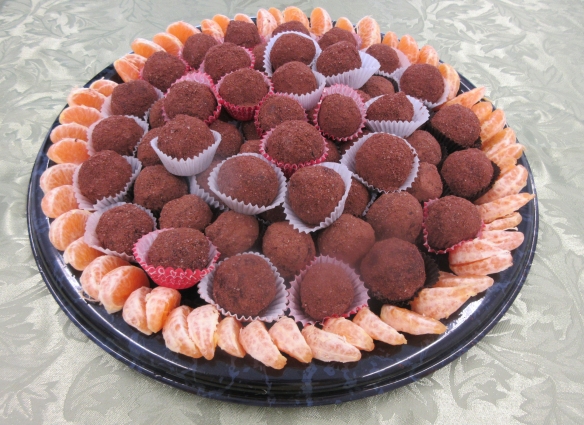
CHOCOLATE FIREBALLS

Yield: about 25 one-inch confections

Confections

1 1/2 cups whole almonds

1 1/2 cups walnuts

3 cups pitted dates, snipped in half

5 tablespoons raw cacao powder or unsweetened cocoa powder

1/4 cup plus 1 tablespoon maple syrup

2 teaspoons vanilla extract

1 teaspoon ground cinnamon

1/2 teaspoon caramel extract
1/2 teaspoon black pepper

1/2 teaspoon cayenne

5 to 6 tablespoons water

Coating

6 tablespoons almond meal

4 tablespoons unsweetened cocoa powder

3 tablespoons organic sugar

1/4 teaspoon cayenne

TO MAKE THE CONFECTIONS, put the almonds and walnuts in the food processor and process until the nuts are finely ground but still retain a little texture. If you prefer a confection with a little crunch, process briefly so the nuts still retain their crunchy nature. Process a little longer for a smoother texture. Transfer the nuts to a large bowl.

Put the dates, cacao powder, maple syrup, vanilla, cinnamon, caramel extract, pepper, and cayenne in the food processor. Add 5 tablespoons of the water and pulse and process until the ingredients are smooth and creamy or lightly textured as desired.

Pour the date mixture into the bowl with the nuts and use your hands to thoroughly combine the ingredients. If the mixture seems too stiff, add the remaining 1 tablespoon of water and mix well to incorporate it completely. Set aside for 5 minutes.

TO MAKE THE COATING, combine the Coating ingredients in a separate bowl. Using your hands, roll the confection mixture into 1-inch balls or small logs, then, roll them in the coating, covering them completely.

Put the confections in a covered container. If using within a week or two, store the confections in the refrigerator. For longer storage, put them in the freezer. Frozen, the confections will keep for up to 3 months.

There are several ways to enjoy the confections. Some people enjoy them right from the freezer. Others prefer them partially defrosted, about 10 minutes out of the freezer. They’re also delicious served completely defrosted.

Notes:

When preparing this recipe, be sure to snip the dates in half with a kitchen scissors to avoid date pits that might damage the food processor.


Cocoa Powder vs. Raw Cacao

Most supermarkets sell unsweetened cocoa powder, while natural food markets sell both unsweetened cocoa powder and raw cacao powder. Between them there’s a world of difference.

Unsweetened cocoa powder has shed all or most of its natural fat content, leaving only a minute amount of its natural cocoa butter intact. Raw cacao powder is considerably more expensive, but some cooks consider it worth the extra price. Because it still contains its natural cocoa butter (the magical fat that boosts the flavor of the chocolate), raw cacao delivers richer flavor with more depth.

The two points to consider when deciding which chocolate to buy for baking or confections are flavor and fat content. If you’re aiming for lower fat foods, stick to the unsweetened cocoa powder. If the fat content is not a consideration, go for the more intense flavor and choose the raw cacao powder.

Caramel Extract: Caramel extract is not available in grocery stores. I order it online from J.R. Watkins – https://www.jrwatkins.com

******************************************************
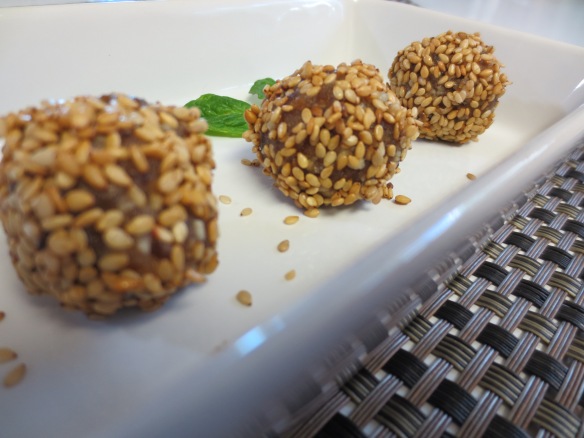
TAHINI PEANUT CONFECTIONS

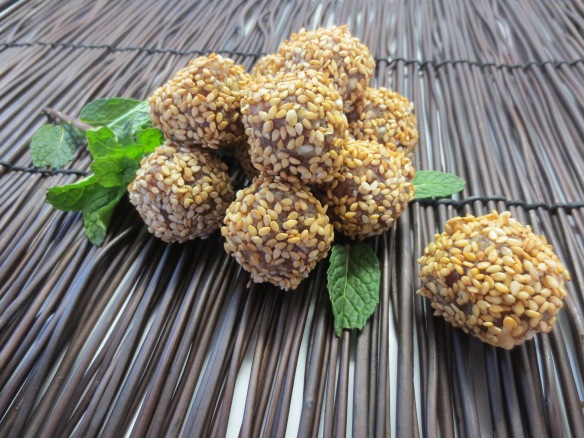
If you’re invited to dinner or a holiday party, bring some of these confections along as a hostess gift and watch the recipients beam with joy. With their captivating sesame flavor and date-sweetened goodness, these little tidbits make outstanding holiday gifts. Prepare these well ahead and keep them frozen so you can be ready when the festive season comes along. The act of giving is reward itself, but you’ll receive extra gratitude when you present these treats in an attractive jar or box attractively wrapped in their holiday best.
My hubby is a happy camper when he can reach into the freezer any time year-round and pluck a sweet frozen treat from the plastic container I attempt to keep filled. He claims they taste better when frozen–personally, I think he just doesn’t want to wait the ten or fifteen minutes for them to reach room temperature.

Yield: 45 to 50 confections

2 cups firmly packed pitted dates, snipped in half

1 cup roasted unsalted peanuts
1/2 cup tahini

2 to 6 tablespoons water

1/4 teaspoon caramel extract

Coating

1 cup natural or toasted sesame seeds

TO MAKE THE CONFECTIONS, combine the dates, peanuts, tahini, water, and caramel extract in the food processor and pulse and process until well blended. Longer processing will create a smoother confection. If you prefer a chunkier confection, you can control the texture by shorter processing and stopping the machine frequently to check the results.

Form the mixture into balls, using about one teaspoon for each confection. Roll, squeeze, and use your fingers to form the mixture into balls or ovals.

TO COAT THE CONFECTIONS, put the sesame seeds in a small, deep bowl and roll each ball in the seeds, coating it completely.

IF PLANNING AHEAD FOR GIFTING, put the finished confections in a covered container and store it in the refrigerator for up to 2 weeks or in the freezer for up to 3 months. Be sure to thaw the confections completely before wrapping them for gifting.

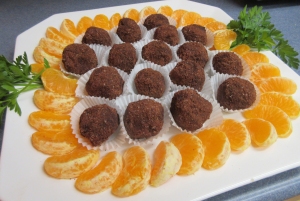
TO SERVE THE CONFECTIONS AT HOME for your own family or guests, line an attractive dish with a doily, arrange the confections on the dish, and garnish with a sprig of fresh mint. They’re delicious eaten at room temperature, chilled, or even frozen.

POMEGRANATE SALAD WINS THE HOLIDAY RIBBON!

Pomegranate Apple Salad5 copyPOMEGRANATE-APPLE SALAD WITH GINGER AND MINT

Taking full advantage of the fruits of the season, this sweet and tangy tart salad makes an eye-appealing side dish, adding diversity in flavor and texture. And, it’s so easy to assemble. You’ll quickly notice that with each bite of this zesty and flavorful fruit mélange, the plump, juice-filled pomegranate seeds release their rich, ambrosial juices, and deliver bracing sweetness with a pleasing crunch.

I’ve made this salad many times over the years and discovered it’s easy to vary its good looks by sometimes cutting the fruits into small dice, while on other days I make the salad much chunkier.whole-and-sliced-pomegranates

Unfortunately, this is not a salad you can make a day or two ahead because it rather dramatically loses its bright looks as well as fresh flavors. You CAN remove the seeds from the pomegranate a day or two ahead and refrigerate them.  If you make sure to have everything at hand, it’s a fairly quick assembly.

 POMEGRANATE-APPLE SALAD WITH GINGER AND MINT

 Yield: 6 servings

1 large pomegranate

2 sweet, crisp apples, unpeeled, choppedPomegranate Apple Salad5 copy

8 ounces edamame, cooked and shelled

1 navel orange, peeled and chopped

3 tablespoons maple syrup

2 tablespoons freshly squeezed lemon juice

2 tablespoons pomegranate molasses

1 tablespoon balsamic vinegar

2 to 3 heaping teaspoons minced peeled fresh ginger

3/4 teaspoon salt

1 to 2 tablespoons minced fresh mint leaves

  1. Carefully following the handy directions below, remove the pomegranate seeds, drain them well and put them in a large bowl.
  1. Add the apples, edamame, orange, maple syrup, lemon juice, pomegranate molasses, balsamic vinegar, ginger, and salt and toss well to distribute the ingredients evenly.
  1. Add half the mint leaves and mix well. Garnish the top of the salad with the remaining mint leaves. Serve immediately or refrigerate. Serve the salad within 2 hours to preserve the bright colors.

Two Techniques for Retrieving Pomegranate Seeds

Pomegranate-seeds1Removing the pomegranate seeds from a fresh pomegranate is easy. Here’s one handy technique:

  1. Put on an apron. Pomegranate juice will most likely splatter a bit, so protect your clothing. Have a deep bowl handy. Wash the pomegranate and cut it in half crosswise. Put the cut sides up and make a couple of cris-cross cuts into each half.
  2. Take one half, turn it upside-down over the bowl, and use your fingers and thumbs to break up the sections. Some of the seeds will begin to fall out. Tap on the top to release more seeds.
  3. Continue to use your fingers and thumbs to loosen the seeds from the pith by pushing on them until all the seeds are in the bowl. Use them immediately or put them into a covered container and refrigerate them. They’ll keep well for up to a week.

______________________________________________________

Here’s another method that involves releasing the pomegranate seeds in water:

Ripe pomegranate on the branch. The foliage on the background.

Ripe pomegranate on the branch. The foliage on the background.

  1. Place a colander into a very large, deep bowl and fill the bowl with enough water to submerge a large pomegranate. A salad spinner is the perfect bowl and colander set-up.
  2. Put the pomegranate on a cutting board and cut the top off. Carefully, cut the pomegranate vertically into six sections.
  3. Working with one section at a time, lower it into the water with the seeds facing downward. Use your fingers to release the seeds into the water.
  4. Most of the seeds will sink to the bottom, while the pith floats to the top for easy removal with a skimmer. Repeat the process with the other pomegranate sections. Then, simply lift the colander and shake off the excess water.

For convenience, remove the pomegranate seeds a day ahead, put them in a container, and refrigerate them until ready to use. To prevent the naturally bright colors of the pomegranate seeds and edamame from becoming muddy looking, assemble the salad an hour or two before serving, and the salad will look bright and cheery and very inviting.

CRANBERRIES COME TO BRUNCH DRESSED IN HOLIDAY RED!

 Cranberry Muffins

CRANBERRY MUFFINS

If you’re a cranberry lover like I am, you, too, will revel with joy at the sight of these voluptuous golden muffins with a fluff of bright red berries on top and a confetti of cheery red bits of cranberries dotted throughout the batter.

The sweet-tart flavor blend is heavenly–that first bite will confirm that. But don’t take my word for it–bake up a batch of these little sweeties and I’ll bet you’ll find these muffins just as irresistible as I do.

They’re ideal breakfast treats with their hearty base of rolled oats and delicate sweetness. To create a crunchy texture, add 1/2 cup of chopped walnuts, pecans, or hazelnuts.

For an appealing holiday Brunch, I like to make the Cranberry Muffins along with another Cranberry Muffinsmuffin variety. I can make them in advance and tuck them into the freezer. About 20 minutes before serving, I take them out of the freezer and put them on a parchment-lined baking sheet. Then, I tuck them into a preheated 375-degree F. oven and in 20 minutes they’ll start to fill the kitchen with crazy-tempting aromas.

I always include a colorful fruit salad with chopped apples, pears, Fuyu persimmons, navel oranges, strawberries (if they look plump and fresh) and pomegrante seeds. If I can find some beautiful red or black grapes, those add a wonderful touch of color and rich sweetness.

Vegan sausages, either homemade or prepared, always make a tasty and very satisfying addition to a festive holiday Brunch. And the finishing touch can be a steaming cup of herbal tea, coffee, or hot chocolate.

This recipe makes a dozen muffins, but could easily make two recipients happy with a wrapped box of half-dozen each. To spread the joy even further, follow the suggestion below to create four dozen adorable little mini muffins and package them in small gift boxes tied with holiday ribbons.

 Cranberry Muffins

CRANBERRY MUFFINS

Yield: 12 muffins

1 1/4 cups soymilk

1 tablespoon apple cider vinegar, rice vinegar, or distilled vinegar

2 1/3 cups fresh cranberries, divided

3/4 cup plus 1 tablespoon organic sugar, divided

2 cups whole wheat pastry flour

1 1/4 cups wheat bran

1/2 cup old fashioned rolled oats

1/2 cup golden raisins

2 teaspoons baking powderCranberry Muffins

1 teaspoon ground cinnamon

1/2 teaspoon ground cardamom

1/2 teaspoon salt

1/2 teaspoon baking soda

1/2 cup mashed ripe banana

3 tablespoons organic canola oil

3 tablespoons maple syrup

1/2 teaspoon vanilla

  1. Preheat the oven to 400 degrees F. and line two 6-section muffin pans with paper baking cups or use an ungreased 12-section silicone muffin pan. Put the muffin pans on a large rimmed baking sheet.
  2. Pour the soymilk into a medium bowl and add the vinegar. Stir well and set aside to sour.
  3. Coarsely chop the cranberries in the food processor. Remove 1/3 cup of the cranberries to a small bowl and stir in 1 tablespoon of the sugar. Set aside for the topping. Transfer the remaining 2 cups of cranberries to a large bowl and add the remaining 3/4 cups sugar.
  4. Add the flour, wheat bran, rolled oats, raisins, baking powder, cinnamon, cardamom, salt, and baking soda to the bowl and stir well.
  5. Stir the bananas, canola oil, maple syrup, and vanilla into the soured soymilk and mix well. Add the wet ingredients to the dry ingredients and mix thoroughly to form a thick batter.
  6. Spoon the batter into the prepared muffin pans, filling each section to the brim. Place a dollop of the reserved cranberry topping onto the center of each muffin and bake for 28 to 33 minutes or until a toothpick comes out clean. Cool the muffins 10 to 15 minutes before removing.

Cranberry MuffinsNote:

Because cranberries are so seasonal, you may consider substituting fresh apples, pears, peaches, nectarines, plums, apricots, or berries to enjoy this tasty recipe year round.

Suggestion:

Turn your one-dozen muffins into four dozen of the cutest little mini muffins you’ve ever seen by baking them in mini muffin pans. Baked in metal mini pans, the muffins will be done in 12 to 14 minutes. The silicone mini muffin pans make slightly larger minis and will bake in 15 to 20 minutes.

To prepare well ahead of the holidays, put the baked mini muffins on metal or plastic dishes or trays and tuck them, uncovered, into the freezer. When completely frozen, transfer the muffins to a heavy-duty plastic bag and seal tightly. Frozen, the muffins will keep for 3 to 4 months. Be sure to defrost the muffins before packaging them for gift giving.

ACORN SQUASH GETS SOME SWEET LOVE!

MAPLE SQUASHFOR ZEL MAPLE BAKED ACORN SQUASH

Laura Theodore is a 2014 TASTE Award-winning television personality, radio host, vegan chef, cookbook author and recording artist. Ms. Theodore is author of Jazzy Vegetarian Classics: Vegan Twists on American Family Favorites and Jazzy SQUASH LAURA ZELVegetarian: Lively Vegan Cuisine Made Easy and Delicious. Laura is the on-camera host of the weekly Jazzy Vegetarian cooking show on PBS and she hosts the podcast radio show, Jazzy Vegetarian Radio. Laura has made guest appearances on ABC, NBC, CBS, and FOX, and she was recently featured on The Talk on CBS <https://vimeo.com/79038409> , Insider/Entertainment Tonight, News 4-NBC, Fox News 8, Better TV, and WCBS Radio. Laura has been featured in the New York Times, New York Daily News, VegNews, Family Circle, Readers Digest, PBS Food, Naked Food and Healthy Aging, among many others. A love for good food, compassion for animals, and enthusiasm for great music has created a joyous life path for Laura Theodore. Read more at: http://www.lauratheodore.com <http://www.lauratheodore.com>

MAPLE BAKED ACORN SQUASH

Makes 4 servings
2 small acorn squash, halved and seeded
3 tablespoons maple syrup
2 teaspoons vegan margarine
1 teaspoon ground cinnamon or pumpkin pie spice


Preheat the oven to 400 degrees F. Line a rimmed baking pan with unbleached parchment paper. Put the acorn squash halves, cut-side-up, on the prepared baking pan. Put 2 heaping teaspoons maple syrup, 1/2 teaspoon margarine, and π teaspoon cinnamon or pumpkin pie spice in the center of each squash.
Tent with foil and bake 45 to 50 minutes or until the squash is soft and filling is bubbling.

SRIRACHA AND BRUSSELS SPROUTS GET MARRIED!

 Randy's BrusselsMAPLE-SRIRACHA ROASTED BRUSSELS SPROUTS

WITH CRANBERRY WILD RICE

Randy Clemens is the author of The Sriracha Cookbook, The Veggie-Lover’s Sriracha Cookbook, and co-author of The Craft of Stone Brewing Co. He is a graduate of the California School of Culinary Arts and a BJCP Recognized Beer Judge. When not writing for Los Angeles magazine and other stellar publications, he can sometimes be found cooking, playing baritone horn, practicing yoga, or just trying to help make the world a better place. If one (or more) of these things also tickles your fancy, you can follow Randy’s musings on Twitter via @SrirachaBook and @RandyClemensEsq. Photo of Randy Clemens by Tyler Graham.

RANDY CLEMENS 4l_aHNVby8iRpg0YdN6nEkE7pEoQyOvb5LV2lORGkKx3141NE=w1226-h582MAPLE-SRIRACHA ROASTED BRUSSELS SPROUTS WITH CRANBERRY WILD RICE
Makes 4 to 6 servings

Cranberry Wild Rice

2 tablespoons extra-virgin olive oil

1 small red onion, diced

3 cloves garlic, minced

2 bay leavesSRIRACHA COOKBOOK 3kIsrR-sDpX0rAPo8rV2h6b3XBz0O5_h2u7bhN0Rr7hObWeEuA=w1226-h582

1 1/2 cups wild rice

3 1/2 cups vegetable stock

1/2 cup unsweetened dried cranberries

1/4 cup chopped raw walnuts or pecans

2 tablespoons minced fresh rosemary

Salt and freshly ground black pepper

Brussels Sprouts

1/2 cup Grade B maple syrup or raw agave nectar

3 tablespoons extra-virgin olive oil

3 tablespoons Sriracha

1 1/2 tablespoons Bragg Liquid Aminos or low-sodium soy sauce

Juice of 1 lime

1 pound Brussels sprouts, trimmed and halved lengthwise

Chopped fresh flat-leaf parsley, for garnish (optional)

To make the rice, heat the oil in a large Dutch oven or pot over medium-high heat. Add the onion and sauté until softened, 5 to 7 minutes. Add the garlic and bay leaves and sauté just until the garlic is fragrant, about 30 seconds. Add the rice and stir until evenly coated. Continue to cook, stirring occasionally, until the rice is slightly toasted and has a nutty aroma, about 3 minutes. Pour in 1 cup of the stock to deglaze the pan, using a wooden spoon to scrape up all the stubborn, tasty brown bits. Add the remaining 2 1/2 cups of stock and the cranberries. Bring to a boil, then immediately lower the heat, cover, and simmer until the rice is tender and some of the grains have popped, 50 to 60 minutes. Uncover and fluff with a fork. Simmer for 5 minutes, stirring occasionally. Remove from the heat and drain off any excess liquid.

While the rice is cooking, prepare the Brussels sprouts. Preheat the oven to 375°F. In a large bowl, combine the maple syrup, oil, Sriracha, liquid aminos, and lime juice and whisk until well blended. Add the Brussels sprouts and toss until evenly coated. Using a slotted spoon, transfer the Brussels sprouts to a nonstick or parchment-lined rimmed baking sheet or a large cast-iron skillet and spread them in a single layer. Reserve any liquid left in the bowl. Bake the Brussels sprouts for about 25 minutes, until tender and browned.

To finish the rice and serve, add the walnuts to the rice without stirring. Cover and let stand for 5 minutes. Add the rosemary and fluff with a fork to combine. Season with salt and pepper to taste. Serve the Brussels sprouts over the rice, garnished with a healthy drizzle of the reserved maple-Sriracha dressing and a sprinkling of parsley.

You can use honey in place of the maple syrup if you wish. Raw orange blossom honey would be especially nice.

Reprinted with permission from The Veggie-Lover’s Sriracha Cookbook: 50 Vegan “Rooster Sauce” Recipes That Pack a Punch by Randy Clemens. Published by Ten Speed Press, a division of Random House, Inc. Text copyright © 2013 by Randy Clemens. Photographs copyright © 2013 by Leo Gong. Veggie Lovers Sriracha Cookbook

Taste the Irrestibles — Resistance is Futile!

irresistible on platterIRRESISTIBLES

My goal was to come up with a special cookie for the holiday cookie tray–and to make a cookie with a long shelf life so the recipe could be prepared in advance for giving as gifts.

I just love it when a first-time experiment comes together on the first try. That was my reward when I decided to do something unique with a fruit and nut mixture that often serves as the base of many commercial raw fruit bars.

I loaded the fruity mixture with tons of nuts and wanted to see what would happen if I formed it into cookies and baked them. But for how long? And how big should I make them?

I took a stab at making them 2 inches in diameter and baking them 15 for minutes. OMG! Irresistible On baking panThey were absolutely IRRESISTIBLE! Yet, with their unusual texture they really weren’t like the familiar crispy cookies most people know, nor were they confections–but, interestingly, somewhere in-between.

It was not only the irresistible flavor these offer, but also the exceptional crunchy-on-the-outside chewy-on-the-inside texture that was so appealing. Here’s another thing I noticed: They kept amazingly well sitting on my kitchen counter in a heavy-duty plastic bag I had left open for several days. When I sealed the plastic bag, the cookies would lose their crunch. The following week I packed them in my suitcase and took them to Massachusetts when visiting my daughter, and they still tasted irresistibly delicious.

I had a few of these little goodies left at home sitting on the counter in an open plastic bag and was delighted that time (about 3 weeks) had not diminished their exceptional flavor or texture.

They’re great travelers! Take them on a plane trip, pack them on a road trip (the kids will love ’em), wrap them in a gift box and ship them to far-away friends and family. All they need is a good home equipped with a pack of cookie monsters.

I knew I had something special and that they would make welcome little homemade gifts during the holidays. If I wrapped them in blue ribbon, I might bring them to a Hanukkah party. I could tie them up with a red and green bow and they would be perfect nibbles for my friend’s Grandma for Christmas.  And by putting the Irresistibles in a gift box wrapped with red, green, and black, they would make the perfect homemade Kwanzaa gift for someone special.

Here are a few handy notes that will help bring the recipe together with ease. You’ll need:

  • A hammer for coarsely chopping the almonds
  • A hand-crank nut mill for coarsely grinding the walnuts
  • A large food processor, at least 11 cup capacity
  • Kitchen scissors for snipping the dates and dried apricots

When the Irresistibles are baked and cooled, treat yourself to one, or two, or—-maybe just one more!

IRRESISTIBLES

Yield: about 50 cookies


2 1/2 cups almonds, dividedIrresistible Single

1 1/2 cups walnuts, divided

2 tablespoons raw cacao nibs


1 1/2 cups pitted dates, snipped in half

3/4 cup maple syrup

1/2 cup Turkish apricots, snipped in half

1/2 cup rolled oats

3 tablespoons unsweetened cocoa powder or raw cacao powder

2 tablespoons water

1 teaspoon ground cinnamon

1/2 teaspoon ground nutmeg


30 whole almonds

  1. Preheat the oven to 325 degrees F. and line 3 large rimmed baking sheets with parchment.
  2. Put 1 cup of the almonds in a heavy-duty plastic bag, seal it, and coarsely chop the nuts with a hammer. Transfer the nuts to a large mixing bowl. Put 1/2 cup of the walnuts in a hand-crank nut mill and coarsely grind them. Add them to the bowl with the the almonds, add the cacao nibs, and set aside.
  3. Put the remaining 1 1/2 cups of almonds into the food processor and process to form a coarse meal. Add the remaining 1 cup walnuts, the dates, maple syrup, apricots, rolled oats, cocoa powder, water, cinnamon, and nutmeg and pulse and process to form a slightly chunky mixture. You may have to stop the machine several times to redistribute the ingredients, but patience pays off. The mixture will be very solid.
  4. When the ingredients are evenly distributed and none of the apricots and nuts are larger than 1/8 inch in size, transfer the mixture to the bowl with the chopped nuts.
  5. Roll up your sleeves and use your hands to work the nuts and nibs into the mixture, incorporating them thoroughly into the firm “dough.”
  6. Lightly oil your hands and roll the mixture into balls about 1 to 1 1/4 inches in diameter. Space them about 1-inch apart on the prepared baking sheets. Use the heel of your hand or fingers to press down on the balls, forming cookies about 2 inches in diameter.
  7. Press an almond into the center of each cookie and bake for 15 minutes. Do NOT overbake! Cool the cookies completely before removing them from the pan.
  8. To store the Irresistibles, put them in a heavy-duty plastic bag, but do not seal it. They keep well at room temperature for up to 1 week. For longer storage, put the Irresistibles in the refrigerator for up to 3 months.

Beets Never Tasted this Good!

BOUND FOR GLORY BEETS

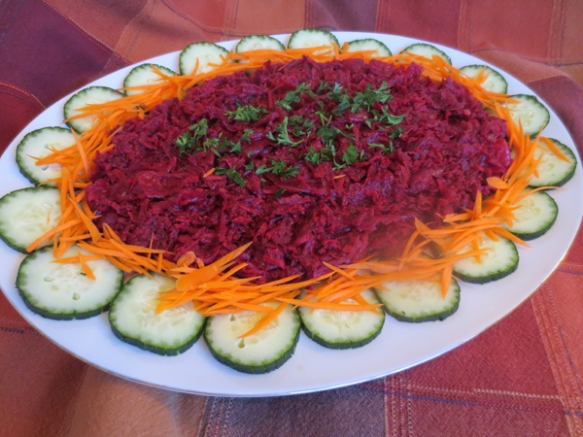
This is a charming side dish perfect for any occasion. It looks great on the buffet table but you can easily plop in into a bowl and pass it at the table. It’s so versatile you can serve it hot, cold, or room temperature so it makes the ideal prep-ahead recipe. Here’s an extra bonus–you can even make it two days ahead and it still tastes great. That means that leftovers will still be delicious the next day.

If you’ve got a crowd coming, count on this recipe to go a long way. For a small family dinner, consider cutting the recipe in half or you’ll have tons left over. Bound for Glory BeetsBecause of the unique seasonings, the beets make a tasty salad topper or even a crown for polenta, or the base of a Russian salad –you name it.

I love that this recipe comes together so quickly with the food processor playing a key role in prepping the beets and carrots. That very special appliance is truly one of the miracles of our modern day  kitchens. Our grandmothers never dreamed of such things that cold do the work of shredding and chopping in seconds.

One little heads-up: Horseradish can be brazenly spicy! Use it with moderation unless your family adores its pungent nip. I start with 1 tablespoon, mix it in well, and taste. That’s usually enough for my family. But–and this is worth noting. If the horseradish has been hanging around your fridge for some time, it has lost a good bit of its zesty nature. In that case, even two tablespoons of it might be pretty darned good. If you buy a fresh jar, though, you’ll find that even one tablespoons can clear your sinuses.

BOUND FOR GLORY BEETS

Yield: 8 to 10 servings

Beets

3 large golden or red beets (1 1/2 to 2 pounds), peeled and coarsely shredded

2 medium onions, chopped

1 large carrot, coarsely shredded

1 cup water or more as needed


Sauce

1 /4 cup plus 2 tablespoons Dijon mustard

2 tablespoons water

2 tablespoons agave nectar or maple syrup

1 to 2 tablespoons prepared non-dairy horseradish

3 tablespoons fresh chopped dill or 1 tablespoon dried dill weed


Garnish

1 cucumber, scored with fork tines, and sliced

Bound for Glory Beets 21 medium carrot, peeled and coarsely shredded or sliced into thin          matchsticks with a julienne peeler

2 to 3 tablespoons coarsely ground walnuts

2 tablespoons chopped parsley

  1. Combine the beets, onions, carrot, and water in a large, deep skillet and cook and stir over high heat for 8 to 10 minutes, or until softened and most of the water has evaporated. Add 1 or more tablespoons of water only as needed to cook the vegetables and prevent burning.
  2. While the beets are cooking, combine the Dijon mustard, water, agave nectar, horseradish, and dill in a small bowl and mix well. Decrease the heat to medium and add the Dijon mixture. Cook for 1 or 2 minutes longer, stirring well to marry the flavors.
  3. Transfer the beets to an attractive serving platter, spooning them into the center to leave a border.
  4. To garnish, surround the beets with the cucumbers. Spoon the carrots next to the beets. Sprinkle the center of the beets with the ground walnuts and sprinkle with parsley.

Alternative Serving Suggestions

Change the whole look of the dish by using beets of two colors. Cook 2 medium golden beets and 2 medium red beets separately, adding 1 onion and medium carrot each. Divide the sauce between the 2 kinds of beets and arrange them in unique ways on the platter:

  • Form the two colors in a yin-yang shape
  • Arrange the two colors side-by-side or
  • Place one color in the center of the serving platter and surround it with the other color