CELEBRATE A WHITE CHRISTMAS AT THE TABLE

WHITE CHRISTMAS TRIO WITH SAVORY WALNUT SAUCE

A beautiful main dish, this trio features a tasty grain as the base, topped with a hearty serving of vegetables. The final topping is a snowy white, ultra creamy walnut sauce garnished with fresh pomegranate seeds and a sprinkle of parsley.

While it looks complicated, it’s really quite manageable with good planning. The bulgur, vegetables, and the sauce can each be made a day ahead and stored in a container that can be gently warmed in the oven. You don’t even have to warm the sauce–just enjoy it at room temperature and it will be delightfully creamy and delicious.

This is a fun dish to serve because it lends itself to inventively creative presentations. Assembling the dish will tap into your innovative notions and allow you go be as expressive as your inner artist allows. If you prefer simplicity, that’s totally OK and your family will still enjoy a luscious and healthy whole grain dish complete with vegetables and a unique, walnut-based sauce that’s white as snow to top off the White Christmas Trio.

To fill out the meal, I would also add legumes, a side vegetable, and a gorgeous salad. Of course, a delicious appetizer makes a great start to the festivities. Perhaps the Yin Yang Thanksgiving Paté. A lighter choice might be the Smoky Garlic Stuffed Endive. I’ve posted some fun choices for your holiday dessert and will let you explore the many recipes by clicking on Desserts.

WHITE CHRISTMAS TRIO WITH SAVORY WALNUT SAUCE

Yield: 6 to 8 servings

Bulgur Wheat

1 1/2 cups coarse bulgur wheat or Basmati brown rice

3 cups water

1 1/2 teaspoons salt

1/3 cup raisins

Walnut Sauce

3 cups walnuts

3 cups vanilla soymilk

1 to 2 tablespoons nutritional yeast

1 teaspoon salt, or to taste

1/2 teaspoon organic sugar

1/4 teaspoon pepper

Pinch cayenne (optional)

Vegetables

2 large carrots, coarsely grated

2 large zucchini squashes, coarsely grated

1 large yellow summer squash, coarsely grated

1 medium onion, chopped

2 tablespoons water

1 tablespoon extra virgin olive oil

2 cloves garlic, thinly sliced, crosswise

1/2 teaspoon oregano

1/2 teaspoon basil

1/2 teaspoon marjoram

1/2 to 1 teaspoon salt or to taste

Freshly ground black pepper

Juice of 1/2 lemon

Garnish

1/2 to 3/4 cup pomegranate seeds

2 tablespoons finely chopped parsley

TO MAKE THE BULGUR WHEAT, combine the bulgur, water, and salt in a 2-quart saucepan. Cover, and bring to a boil over high heat. Reduce the heat to low, and steam for 12 to 15 minutes (steam Basmati brown rice 35 to 45 minutes, or until tender).

Put the raisins in a small bowl and cover with hot water. Set aside to plump them while preparing the remaining ingredients.

TO MAKE THE WALNUT SAUCE, put the walnuts, soymilk, nutritional yeast, salt, pepper, and sugar in a blender. Process until smooth and creamy. Adjust seasonings as needed. The sauce will thicken when standing. Set aside in a saucepan and warm gently before serving.

TO MAKE THE VEGETABLES, combine the carrots, zucchini, yellow squash, onions, water, olive oil, garlic, oregano, basil, marjoram, salt and pepper in a large deep skillet. Cook and stir over medium-high heat until the vegetables are soft, about 5 to 7 minutes. Add 1 or more tablespoons of water as needed to prevent burning the vegetables. Adjust seasonings and add lemon juice to taste.

Drain the water from the reserved raisins and add them to the vegetables and toss well.

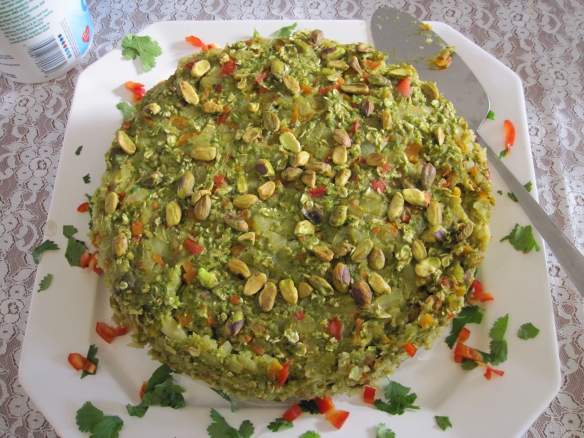
TO ASSEMBLE THE DISH:

  • Mound the bulgur wheat onto a large serving platter.
  • Spoon some of the walnut sauce over the bulgur, leaving a 1-inch border of the bulgur showing.
  • Form a ring of the cooked vegetables, leaving a 1-inch border of bulgur wheat around the edges.
  • Finish with a sprinkle of pomegranate seeds and parsley over the top.
  • Serve the remainder of the walnut sauce on the side.

LET’S GET READY FOR A VEGAN THANKSGIVING DINNER

PISTACHIO AND SWEET PEA TORTE

WITH ROASTED TOMATO AIOLI

Vegan Thanksgiving yearns for a classic signature dish that becomes a cherished must-have for the Thanksgiving main course. Deliciously seasoned with flamboyant flavors, captivatingly aromatic, and visually appealing, this unique torte is a first-rate holiday entrée that delivers plenty of pizzazz. If you favor sauces to dress up the presentation, include the irresistible Roasted Tomato Aioli, an elegant complement to the torte. Both the torte and the aioli can be prepared a day ahead.

I’ve served this main-dish torte at other times during the winter and spring seasons and it’s always a hit. But mostly, I save it for Thanksgiving or Christmas dinner–that makes it special, and I change it out with other main dishes so it maintains its special status.

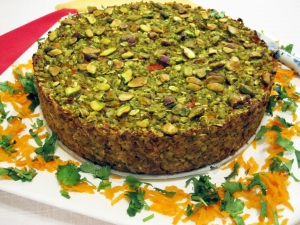
I know the long list of ingredients makes it look scary, but it actually comes together rather well. I’ve even made it two days ahead because it keeps perfectly. And when I bring it to the table, it always gets a few WOWs–feels really nice to hear them.

Although I’ve specified shredded carrots as part of the garnish, sometimes I use sliced persimmons or half slices of oranges. The orange colors set this dish up for an eye-appealing presentation.

Important: Because there are ingredients that require advance preparation, read the recipe thoroughly well in advance of preparing it. That way, you can have the rice cooked and ready, the pistachios roasted and ground, and the frozen peas completely thawed.

PISTACHIO AND SWEET PEA TORTE

WITH ROASTED TOMATO AIOLI


Makes about 10 to 12 servings

Torte

1 1/2 cups water

1/2 cup cashews or walnuts

1 tablespoon plus 14 teaspoon white vinegar or rice vinegar

2 1/2 cups old-fashioned rolled oats

2 teaspoons baking powder

1 3/4 teaspoons salt

1/2 teaspoon baking soda

1/2 cup plus 3 tablespoons coarsely ground roasted pistachios


2 medium onions, diced

2 medium carrots, diced

1 stalk celery, diced

1 red bell pepper, diced

6 cloves garlic, minced

1 (2-inch) piece fresh ginger, peeled and grated

1 teaspoon ground cumin

1 teaspoon ground coriander

1 teaspoon poultry seasoning

1/2 teaspoon fennel seeds, coarsely ground with a mortar and pestle

1/2 teaspoon dried oregano

1/2 teaspoon dried marjoram

1/2 teaspoon ground turmeric

Pinch cayenne

Freshly ground pepper


3 cups cooked short-grain brown rice

1 pound frozen peas, thawed

1 medium carrot, shredded, for garnish

3 tablespoons minced fresh parsley, for garnish

Aioli

1 pound Roma tomatoes, cut in half lengthwise

1 cup water

1/2 cup cashews or walnuts

2 cloves garlic

1 tablespoon plus 2 teaspoons freshly squeezed lemon juice

3/4 teaspoon salt

1/4 teaspoon ground smoked paprika or liquid smoke

TO PREPARE THE PAN, cover the base of a 9-inch springform pan with a piece of parchment paper 2 inches larger. Snap the collar back onto the base, and cut away the excess paper with scissors. Lightly oil the sides of the pan, place it on a baking sheet, and set aside.

TO MAKE THE TORTE, pour 1 cup of the water and the cashews into a blender. Process on high speed until smooth and milky. Transfer to a small bowl, stir in the vinegar and set aside to sour.

Combine the oats, baking powder, salt, and baking soda in a large bowl and mix well. Stir in 1/2 cup of the ground pistachios.

Preheat the oven to 375 degrees F. Combine the remaining 1/2 cup of water, onions, carrots, celery, red bell pepper, garlic, ginger, cumin, coriander, poultry seasoning, fennel seeds, oregano, marjoram, turmeric, cayenne, and pepper in a large skillet. Cook and stir over medium-high heat for 10 to 12 minutes, or until the vegetables are softened. Add 1 or more tablespoons of water as needed to prevent burning.

Add the cooked vegetables and the cooked rice to the oat mixture and combine well.

Put the peas in a food processor. Process until creamy, stopping occasionally to scrape down the work bowl. Add the peas and the soured cashew milk to the vegetable mixture and mix well.

Spoon the mixture into the prepared springform pan and spread to the edges, packing the mixture firmly. Smooth the top and sprinkle with the remaining 3 tablespoons of pistachios. Bake for 55 to 60 minutes, or until the torte is firm when gently pressed. Let cool at least 30 minutes before serving.

TO MAKE THE AIOLI, put the tomatoes on a baking sheet, cut side up, and broil about 3 inches from the heat for 15 to 20 minutes, turning twice while broiling, until completely soft.

Meanwhile, put the water, cashews, and garlic in a blender. Process until smooth, stopping occasionally to scrape down the blender jar. Add the broiled tomatoes, lemon juice, salt, and paprika to the cashew mixture. Process until smooth and creamy, stopping occasionally to scrape down the blender jar. Transfer the sauce to a 1-quart saucepan and simmer over medium heat for about 5 minutes.

TO SERVE THE TORTE, place the springform pan on a large serving platter. To unmold, run a knife around the edge to loosen the torte. Carefully lift off the collar. Garnish the edge of the platter with the shredded carrot and minced parsley. Cut the torte into serving-size wedges and serve with aioli on the side.

I BROUGHT A GHOST TO THE HOLIDAY TABLE!

GHOST PUMPKIN RAGOUT

White pumpkin 2My idyllic vision was to make a dramatic presentation of a tasty, savory stew served inside a plump white pumpkin. I could even picture the dramatic moment I would lift the lid of the pumpkin, stand back, and let my dinner guests watch in amazement as the giant plume of steam rose up from the steaming stew.

After several experiments, I found it impossible to prevent the pumpkin from totally collapsing or half the stew from oozing out the bottom of the cooked pumpkin. Neither was a pretty site. I was glad I hadn’t experimented on guests.

It would have been a beautiful holiday dish and a magnificent presentation–would have–but—–

I tried the experiment about three times and just gave up in frustration! Yet, somehow I hoped to bring a rich, flavorful stew to the table that included scooping up some of that delicious, delicately sweet pumpkin flesh as I was spooning out the stew.

White Pumpkin RagoutMy instincts led me to cook and serve them separately and allow the two to meet up in the soup bowl. That worked like a charm! Here’s a little detail about ghost pumpkins:

Ghost pumpkins, also called albino, Snowball, Casper, Lumina, Baby Boo, Cotton Candy Pumpkin, stand apart from the familiar orange jack-o-lanterns in many ways. Their flesh is considerably thicker and shows off a gorgeous hue of brilliant golden orange. The texture is pleasantly firm and delightfully moist.

White pumpkin 1The white pumpkin’s best-kept secret is its pleasantly sweet flavor, though not as sweet as butternut or kabocha, the Japanese pumpkin. White pumpkins are still less common than the jack-o-lanterns but are becoming more available at chain groceries and farm stands.

A perfect marriage, the white pumpkin is the ideal mate to enhance this celebratory ragout that needs little else to bring pleasure and satiety to a holiday meal.

To give this flavorful ragout its moment in the sun, I served it in a wide, shallow soup bowl and heaped the serving into the center. Serve the stew with plenty of hearty whole-grain bread to mop up any bits of delicious sauce that remains in the bowl.

 GHOST PUMPKIN RAGOUT

 Yield: 12 to 14 hearty servings

1 medium or large ghost pumpkin or 2 large butternut squashes

5 cups waterWhite Pumpkin Ragout

2 cups dry red wine

2 (6-ounce) cans tomato paste

1/2 cup low-sodium soy sauce

4 cloves garlic, crushed

2 sticks cinnamon

2 teaspoons dried thyme

2 bay leaves

3 medium carrots, angle sliced

2 to 3 medium leeks, white part only, cleaned and thickly sliced

2 medium yams, cut into bite-size pieceswhite-pumpkins

1 pound baby white rose potatoes, scrubbed

1 large sweet onion, coarsely chopped

1/2 small cauliflower, chopped

2 small beets, diced

1/2 pound green beans, trimmed, cut into 1 1/2-inch lengths

1/2 pound button or cremini mushrooms, thickly sliced

1 cup red lentilsWhite pumpkin 2

Juice of 1 lemon, or to taste

1/4 cup natural sesame seeds

1 pound frozen peas, thawed and held at room temperature

  1. Preheat the oven to 350 degrees F. Wash the pumpkin and dry it. Using a firm paring knife, cut a 5 or 6-inch diameter hole in the top and gently lift it out by the stem. Use a large spoon to remove the seeds and stringy matter from the pumpkin. Set the seeds aside to roast separately. Place the pumpkin on a large rimmed baking sheet lined with parchment paper or aluminum foil. Bake for 50 to 60 minutes, or until soft when gently pressed, yet still firm.
  2. When the pumpkin is cool enough to handle, cut it into 2-inch chunks, peeling the skin as you go. Set the chunks aside.
  3. While the pumpkin is roasting, combine the water, red wine, tomato paste, soy sauce, garlic, cinnamon sticks, thyme, and bay leaves in a 12-quart stockpot.
  4. Add the carrots, leeks, yams, potatoes, onion, cauliflower, beets, green beans, mushrooms, and red lentils. Cover the stockpot and bring to a boil over medium-high heat. Reduce the heat to medium and simmer gently for 15 to 20 minutes, or until the vegetables are just softened.
  5. Before serving, add the lemon juice to taste and adjust seasonings, if needed.
  6. To serve, spoon some of the pumpkin pieces into wide soup bowls. Spoon the ragout over the pumpkin and sprinkle the top with sesame seeds. The finishing touch is a generous sprinkling of plump peas over the top.

Note:

Butternut squashes make the perfect stand-in if ghost pumpkin is unavailable. Bake them at 400 degrees F. til tender, about 50 to 60 minutes.

Don’t throw those pumpkin seeds away!

roasted-pumpkin-seedsRoasted Pumpkin Seeds

Clean the stringy flesh clinging to the seeds by rinsing them in a bowl of water. Put the seeds on a large rimmed baking sheet and sprinkle with 1 or 2 teaspoons of canola oil. Use your hands to mix the seeds and coat them with the oil. Sprinkle the tops lightly with salt and pepper and toss with a spatula. Put the pan in the oven and roast at 200 degrees for 8 to 10 hours. I let the seeds roast overnight.

MEXICAN FLAG GRACES THE HOLIDAY TABLE WITH PANACHE!

Chiles en NogadaCHILES EN NOGADA

This gorgeous dish was actually created in 1821 in Central Mexico to celebrate Mexican Independence Day, which occurs on September 16, 1810. I came across this recipe when a local library asked me to do a vegan demo on regional Mexican cooking to celebrate Mexican American Heritage month. At first glance, you’ll see the bright colors of the Mexican flag–red, white, and green.

The finished dish is actually stuffed poblano chiles with a sauce made of walnuts.  I think you’ll agree it makes a sensational presentation.

I found the recipe is so appealing and so festive looking, I felt it deserved a place at the holiday table from Thanksgiving through New Years. There’s just one little hitch that’s easily solved. Peaches, which are featured in the recipe, are no longer available in November or December, but sweet fruits like persimmons and pears stand in quite well.

Chiles en NogadaThe other challenge–the original recipe was quite fatty and contained meat, milk, and cheese. No problem–I replaced the meat with beans and created the filling from a composite of several recipes. I’ve added diced zucchini and fresh fruits like diced apples and Fuyu persimmons in place of the candied cactus.

Also, I’ve not battered and fried the stuffed chiles, because I wanted to offer a healthier, less fatty option.

My recipe contains no sugar, but uses the fruits as delicate sweetening. For the Walnut Sauce I use vanilla soymilk and non-dairy cheese made from pea protein to replace the traditional dairy products.

The dish is said to have been created by Puebla nuns for a visiting dignitary, emperor Augustin de Iturbide, a Mexican military chieftain who was instrumental in the Mexican independence movement.

That man didn’t realize how fortunate he was. Chiles en Nogada was not a quick and easy dish to make because it has several components that each require special attention. One recipe I encountered contains 40 different ingredients! Don’t worry, it’s not this one!

In those historic days, there no blenders. To make the creamy Walnut Sauce, they had to use a grinding stone called mano and metate that works like our mortar and pestle.

I’ve created a simplified version of the recipe, but it still involves 3 components–charring the chiles on the stovetop and peeling them, making the filling, and blending the sauce.

Once all the chiles are charred and cleaned and the fruits and vegetables are chopped, the recipe comes together quickly and can be prepared in stages.

For guests who are not fond of chiles, here’s an alternative presentation. Instead of stuffing Chiles en Nogada Nakedthe chiles, I used them as a border surrounding the filling. That way, guests at the buffet table can simply take a helping of filling and side-step the chiles. The topping is slivered almonds.

Don’t side-step the sauce, though. It’s delicious! Just serve it on the side.

 Chiles en Nogada

CHILES EN NOGADA

Yield: 8 servings

8 fresh poblano peppers

FillingChiles en Nogada

1/2 medium onion, chopped

2 cloves garlic, minced

3 to 4 tablespoons water

1 (14-ounce) can diced tomatoes, drained

1 medium zucchini, diced

1 medium tomato, diced

1 bay leaf

3/4 teaspoon salt

1/2 teaspoon ground cinnamon

1/2 teaspoon ground cumin

Pinch ground cloves

1 (15-ounce) can black beans, rinsed and drained

1 medium apple, cored, and diced

1 firm fresh peach, persimmon, or pear, cored and diced

1/4 cup golden raisins

1/4 cup sliced or slivered toasted almonds

Chiles en NogadaSauce

3 cups vanilla soymilk or plain soymilk with 2 teaspoons organic sugar          added

2 cups walnuts

3/4 cup non-dairy shredded mozzarella

Pinch salt

Freshly ground black pepper

Garnish

8 large romaine lettuce leaves

3/4 cup pomegranate seeds or 1/2 red bell pepper, diced

4 green onions, green part only, chopped

  1. Have ready a large rimmed baking sheet lined with parchment or a Silpat.
  2. TO PREPARE THE CHILES, put the poblano peppers directly over a gas flame, using several burners simultaneously. Working with long-handled tongs, turn the peppers frequently until blistered and blackened on all sides, about 5 to 7 minutes. Put the blackened peppers into a bag or wrap them in a towel and set aside for about 5 to 10 minutes to loosen the skins. Alternatively, plunge the blackened peppers into a bowl of water. Rub off the skins under running water to clean the charred chiles.
  3. Carefully cut a vertical slit in each chile and cut out and discard the core and any stray seeds. Arrange the chiles on the baking sheet and set aside.
  4. TO PREPARE THE FILLING, preheat the oven to 350 degrees F. Combine the onion, garlic, and water in a large deep skillet. Cook and stir over medium-high heat, stirring frequently until lightly browned, about 7 to 10 minutes. Add 1 or more tablespoons of water as needed to cook the onions and prevent burning.
  5. Add the diced tomatoes, zucchini, fresh tomato, bay leaf, salt, cinnamon, cumin, and cloves and cook about 3 to 4 minutes.
  6. Add the black beans, apple, peach, raisins, and almonds and cook about 3 to 4 minutes, or until the fruits are just softened.
  7. Open the slits in the chiles and spoon a generous portion of filling into each of them, filling them fully. Close the slits, enclosing the filling completely. Put the chiles in the oven for 10 to 12 minutes to warm through.
  8. TO PREPARE THE SAUCE, put the soymilk, walnuts, mozzarella, salt, and pepper in a blender and process until smooth and creamy.
  9. TO SERVE, line each person’s dish with a lettuce leaf. Put one stuffed poblano on each dish and spoon a generous amount of the sauce over the top and sides, coating each one completely. Garnish with a generous sprinkle of pomegranate seeds or chopped red bell pepper and green onions.


HATCH CHILES BRING SPARKLE TO THE HOLIDAY TABLE!

Roasted Sweet Potatoes 2

vvplogoYour roasted sweet potatoes will practically dance with holiday spirit when they’re drizzled with the zesty nature of this mild chile sauce. And I promise the sauce has just enough mojo to put a magic touch on your festive meal. The sauce can be prepared a day or two ahead and served warmed, chilled, or at room temperature. Leftovers keep well in the fridge for at least 4 or 5 days.

To create a creamy, smooth as velvet sauce, it helps to have a high-speed blender, but with patient soaking and longer blending it should work just fine with a regular blender.

I experimented with this dish for Thanksgiving for the first time. It was such a big hit, I felt it could be a terrific side dish any time during the holiday season.

Then, the following year, I decided to bring more colors to the platter with multi-colored sweet potatoes. In addition to the familiar orange yams, my local Korean market had yellow sweet potatoes and a delicious variety of purple ones called Okinawan sweet potatoes. The lighting wasn’t at its best for a great photo, but I think the result is so appealing I wanted to share it.

Multi-color potatoes 2

ROASTED SWEET POTATOES WITH SIZZLING CHILE SAUCE

Yield: 6 servings

Sweet Potatoes

5 or 6 medium yellow or orange sweet potatoesRoasted Sweet Potatoes

Sizzling Chile Sauce (recipe below)

Parsley sprigs, for garnish

3 to 4 tablespoons chopped purple cabbage, for garnish

  1. Preheat the oven to 400 degrees F. (Gas Mark 6) and have ready a large rimmed baking sheet lined with aluminum foil.
  1. Scrub the sweet potatoes, put them on the prepared baking sheet, and roast for 50 to 60 minutes, or until they are soft when gently pressed. Prepare the Sizzling Chile Sauce while the sweet potatoes are baking.
  1. When the sweet potatoes are done, peel them and cut them into 1-inch thick slices. Multi-color Sweet Potatoes
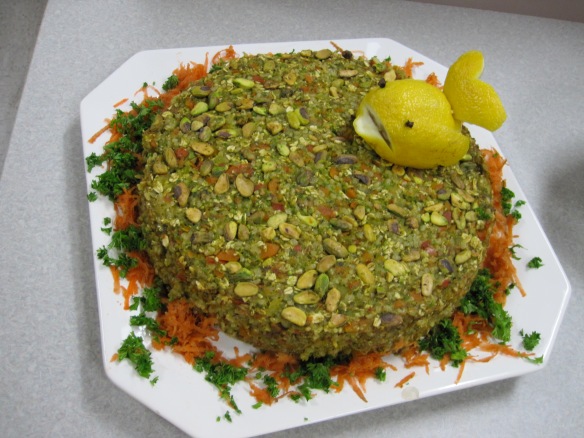
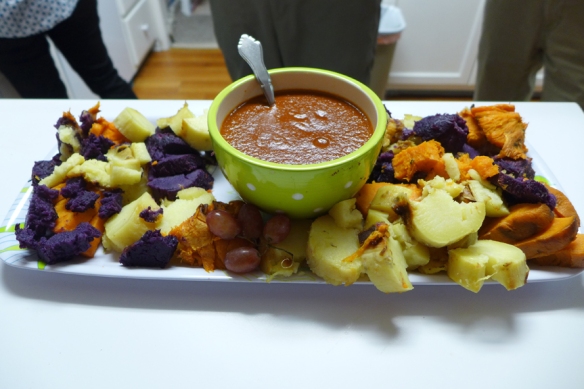
Arrange them on a large platter, overlapping the slices. Garnish with the parsley and cabbage. Alternatively, drizzle some of the sauce over the center of each potato slice.


Sizzling Chile Sauce (Makes about 3 cups)

Chile Sauce2 ounces (56g) Melissa’s dried Hatch chiles or California chiles (about 8 to 10 dried chiles)

3 cups (720 ml) boiling water

2/3 cup (160 ml) chopped onions

5 garlic cloves, coarsely chopped

2 teaspoons extra virgin olive oil

1/3 cup (80 ml) coarsely chopped almonds

2 tablespoons toasted sesame seeds

1 teaspoon salt

1/4 cup (60 ml) brown sugar

1/4 cup (60 ml) rice vinegar or other mild vinegar

  1. Prepare the Sizzling Chile Sauce while the sweet potatoes are baking. Using kitchen scissors, cut the chiles open and discard the seeds, ribs, and stems. Snip the chiles into coarse pieces and put them in a bowl. Pour the boiling water over the chiles to cover. Set aside to soften for about 1 hour.
  1. Meanwhile, combine the onions, garlic, and olive oil in a 10-inch (25 cm) skillet. Cook and stir over high or medium-high heat for 2 to 3 minutes, or until the onions begin to soften. Add 1 or more tablespoons of water if needed to prevent burning the onions and garlic.
  1. Add the almonds and sesame seeds to the pan and cook another minute or two.
  1. Transfer the onion mixture to a blender and add the salt, brown sugar, and vinegar.
  1. When the chiles have softened, use a slotted spoon to transfer them to the blender. Add 1 cup (240 ml) of the chile soak water and process for a full minute or two until the sauce becomes smooth and creamy. Adjust seasonings, if needed, and serve the sauce on the side.

Alternative serving suggestion: Spoon a line of the sauce down the center of the overlapped sweet potato slices and add a pinch of minced parsley over the sauce. Serve the remaining sauce on the side.


This recipe is part of a fun blogging chain that includes about 96 innovative bloggers sharing amazing holiday recipes. You can easily move backward or forward through the Potluck chain to explore a banquet of tantalizing recipe posts crossing many continents.

To venture over to the blog that precedes mine in the Potluck, click on the go back buttongo_bck-300x257


go_forward-300x243To venture over to the blog that follows mine in the Potluck click on the go forward button


To start at the beginning of the Potluck, click on the stay calm button

Stay-Calm-Beginning-Red


Enjoy the fun holiday recipes and have a holiday blast!!!!!


ACORN SQUASH GETS SOME SWEET LOVE!

MAPLE SQUASHFOR ZEL MAPLE BAKED ACORN SQUASH

Laura Theodore is a 2014 TASTE Award-winning television personality, radio host, vegan chef, cookbook author and recording artist. Ms. Theodore is author of Jazzy Vegetarian Classics: Vegan Twists on American Family Favorites and Jazzy SQUASH LAURA ZELVegetarian: Lively Vegan Cuisine Made Easy and Delicious. Laura is the on-camera host of the weekly Jazzy Vegetarian cooking show on PBS and she hosts the podcast radio show, Jazzy Vegetarian Radio. Laura has made guest appearances on ABC, NBC, CBS, and FOX, and she was recently featured on The Talk on CBS <https://vimeo.com/79038409> , Insider/Entertainment Tonight, News 4-NBC, Fox News 8, Better TV, and WCBS Radio. Laura has been featured in the New York Times, New York Daily News, VegNews, Family Circle, Readers Digest, PBS Food, Naked Food and Healthy Aging, among many others. A love for good food, compassion for animals, and enthusiasm for great music has created a joyous life path for Laura Theodore. Read more at: http://www.lauratheodore.com <http://www.lauratheodore.com>

MAPLE BAKED ACORN SQUASH

Makes 4 servings
2 small acorn squash, halved and seeded
3 tablespoons maple syrup
2 teaspoons vegan margarine
1 teaspoon ground cinnamon or pumpkin pie spice


Preheat the oven to 400 degrees F. Line a rimmed baking pan with unbleached parchment paper. Put the acorn squash halves, cut-side-up, on the prepared baking pan. Put 2 heaping teaspoons maple syrup, 1/2 teaspoon margarine, and π teaspoon cinnamon or pumpkin pie spice in the center of each squash.
Tent with foil and bake 45 to 50 minutes or until the squash is soft and filling is bubbling.

Portobello Mini Pies–a Vegan for the Holidays Spectacular!

Portobello MinisPORTOBELLO MINI PIES

WITH MEDITERRANEAN RELISH

Portobello mushrooms, with their intense, earthy, and woodsy flavor, claim the limelight to offer a platter of richly flavored mini pies with winning charm that has enough pizazz to stand alone. Top the little pies with Mediterranean Relish and they morph into an eye appealing, elegant, and compellingly delicious main dish for the holiday season.

These little mini pies are ideal for a quiet family meal, but they’re also compelling and sophisticated enough to serve your most discriminating foodie guests for a holiday dinner.

Prepare the mini pies and the relish in advance so after a busy day of holiday shopping you can tuck them into the oven for a quick warming. They’ll be ready in minutes.

Add a salad and a steamed vegetable and dinner is done. Then you’ll have plenty of time to relax and share your shopping finds at the dinner table–unless they’re a surprise!

PORTOBELLO MINI PIES

WITH MEDITERRANEAN RELISH

Makes 10 to 12 mini pies 3-inches in diameter.


Mushroom Mini Pies

2 tablespoons water

1 tablespoon flaxseed meal


2 to 3 giant portobello mushrooms (about 3/4 pound), or 3/4 pound cremini or button mushrooms


1 cup cooked brown rice, barley, or buckwheat

1 cup diced onions

1/2 cup almond meal or hazelnut meal

1/2 cup old fashioned rolled oats

2 tablespoons nutritional yeast flakes

1 1/4 teaspoons salt

1/4 teaspoon ground black pepper


Mediterranean Relish

1 (14-ounce) can water-packed artichoke hearts, drained and diced

1 1/4 cups diced fresh tomatoes

10 pitted Kalamata olives, diced

6 pitted Spanish olives, diced

1 green onion, minced

2 tablespoons nutritional yeast flakes

2 cloves garlic, minced

Pinch cayenne

Freshly ground pepper to taste


Few sprigs fresh basil


  1. TO MAKE THE MUSHROOM MINI PIES, preheat oven to 375 degrees F. and have ready a large, rimmed baking sheet lined with parchment or a Silpat.
  2. In a small bowl, combine the water and flaxseed meal. Mix well and set aside to thicken.
  3. Coarsely chop the mushrooms, put them into the food processor in batches, and pulse until finely minced. Transfer the mushrooms to a large bowl.
  4. Add the cooked brown rice, onions, almond meal, rolled oats, nutritional yeast, salt, and pepper to the bowl and mix well with clean hands to distribute ingredients evenly.
  5. If the reserved flaxseed meal has not thickened, beat it with a fork until it forms a thick slurry or put it into the blender and blend for 1 minute to form the thick slurry, about the texture of cooked oatmeal. Add the slurry to the mushrooms and mix thoroughly to distribute the slurry evenly.
  6. Using your hands, form the mixture into mini pies or patties and place them on the prepared baking sheet. Press lightly on the tops to flatten them slightly. Bake for 30 minutes. Turn the mini pies with a metal spatula and bake 12 to 15 minutes longer until tops are firm.
  7. TO MAKE THE MEDITERRANEAN RELISH, combine all the ingredients in a medium bowl and mix well. Adjust seasonings if needed.
  8. TO SERVE, place the mushroom mini pies on a platter and garnish each with a generous dollop of the Mediterranean Relish. Artfully place a basil leaf on each mini pie and bring the remaining relish to the table.

Note: The mini pies and the relish are also the ultimate convenience foods—prepare them a day ahead and chill them separately. Reheat the mini pies at 350 degrees F. for 10 to 15 minutes before serving. The relish will keep for up to 4 days.

Important: If you’ve chosen to use the buckwheat in the in the mini cakes, you may need to add a small amount of water. If the mixture is too dry to hold together when forming the mini pies, add 1 to 3 tablespoons water and mix well with the hands. The mixture should be firm, yet moist but not watery.

A Sweet Dish for Sweet Potato Season

Sweet Potato CakesSWEET POTATO CAKES

If you’ve baked too many sweet potatoes for Thanksgiving and have leftovers, count on these scrumptious little patties to put them to work.

If you don’t have leftover baked sweet potatoes, make some tonight and put an extra 1 or 2 in the oven so you can make these fun-to-eat patties. This is one of those treasured, easy-prep side dishes that you can even make ahead and simply warm briefly in the oven.

The neat thing is they don’t need lots of your attention–once you’ve got them in the oven, you’re free to catch up on the latest issue of your favorite veggie magazine or make a sumptuous salad for dinner.

Yield: about 10 pattiesSweet Potato Cakes 2

2 tablespoons water

1 tablespoon flaxseed meal


1 (15-ounce) can cannellini or Great Northern beans, thoroughly drained and rinsed

1 cup baked, mashed sweet potatoes or yams

1/2 cup diced onions

1 teaspoon fresh lemon juice

3/4 teaspoon salt

1/2 teaspoon pepper


1 cup panko (Japanese bread crumbs) or regular bread crumbs


Garnish

5 cherry tomatoes, halved

Clusters of herbs (sage, basil, parsley, cilantro) or cooked broccoli florets


  1. Preheat the oven to 375 degrees F. and line a large rimmed baking sheet with parchment paper.
  1. In a small bowl, combine the water and flaxseed meal and stir well to moisten the meal completely. Set aside to thicken. Alternatively, combine them in a blender and process until the mixture forms a thick slurry.
  1. Put the beans in the food processor and add the sweet potatoes, onions, lemon juice, salt, and pepper. Process until well combined. Add the flaxseed meal and process briefly until incorporated.
  1. Sprinkle the panko onto a large, shallow bowl or recessed dish and have a spoon ready. Use about 3 to 4 heaping tablespoons of the sweet potato mixture to form patties. Drop each one into the panko and spoon the panko over the top and sides. Use a metal spatula to carefully transfer the patties to the prepared baking sheet and use your hands or the back of a spoon to flatten them slightly.
  1. Bake for 20 to 25 minutes. Carefully turn the patties over with the spatula and bake 15 to 20 minutes longer, or until firm. Transfer the patties to an attractive serving platter and top each one with a cherry tomato half. Garnish the platter with herbs or cooked broccoli florets.


Carrots + Julienne Peeler = Love at First Cut!


Carrot Matchstick 2CARROT MATCHSTICK STIR-FRY

What I love about putting a carrot dish on the buffet table is how its bright, dazzling color jumps out and instantly perks up the whole array of dishes on the table. But I know not everyone loves carrots.

I’ve noticed how I always tended to cater to my family’s tastes and included their favorite veggie dishes at special holiday meals. One liked cooked peas, another preferred green beans, while others would only eat broccoli. No doubt, other households faced similar likes and dislikes.

But as my children grew into adults and made their way in the world, their dining experiences helped to broaden their tastes considerably. Thank goodness! We creative cooks just can’t help being attracted to nuanced ideas. We’re constantly inspired to explore unique flavors, different vegetables, ethnic recipes, exotic herb blends, and anything that brings pleasant change to the palate.

Someone recently asked me where I found inspiration for new dishes. Like many of you, I’m surrounded with inspiration. Perhaps a trip to the market or farmer’s market will jump-start a recipe idea, sometimes it’s a color that inspires, or a bunch of gorgeous radishes pops out and an idea forms in my mind.

A perfect example of an inspiration is the julienne peeler my daughter bought for me. It’s a Julienne peelervegetable peeler with a row of tiny little teeth where the cutting blade would normally be. I’d never seen one before and thought I’d try it out on a carrot. First, I peeled the carrot with a regular peeler, then, applied the julienne peeler, cutting in long strips. What a fabulous discovery this little tool is! I kept playing with it until I had julienned four whole carrots. There was the start of this new dish!

It’s really easy and tasty as can be. What makes this dish stand apart is its unique appearance. Cutting the carrots ultra-thin like this makes them cook within a minute or two. Look for a julienne peeler in shops that specialize in kitchenware or order it from Crate & Barrel or Williams Sonoma. A good quality julienne peeler costs about $12 and really pays off. I also bought one that cost much less, but it doesn’t work as well.

Have fun with the new kitchen toy! I’m going to try mine on potatoes and parsnips next.

Carrot MatchstickCARROT MATCHSTICK STIR-FRY

Yield: 4 to 5 servings

4 medium carrots, peeled and cut into long matchsticks with a julienne peeler

1 small onion, sliced vertically into half moons

3 cloves garlic, minced

1 teaspoon sesame oil

1/4 cup water


1 to 2 teaspoons soy sauce, Tamari, or Bragg Liquid Aminos

1 to 3 teaspoons fresh lemon juice

Salt and pepper to taste


1 tablespoon sesame seeds

1 to 2 teaspoons minced parsley

  1. Put the carrots, onion, garlic, sesame oil, and water in a large, deep skillet. Cook and stir over high heat for 1 to 2 minutes or until just tender. Add 1 or more tablespoons water if needed to prevent burning. When the carrots are soft, turn off the heat.
  2. Add soy sauce, lemon juice, and season to taste with salt and pepper.
  3. Transfer the carrots to an attractive serving bowl and garnish with the sesame seeds and a sprinkle of minced parsley.

Almond Nutloaf, a Gorgeous Holiday Choice

 ALMOND NUTLOAF WITH TOMATO HERB GRAVY

Almond NutloafALMOND NUTLOAF WITH TOMATO HERB GRAVY

Holiday dining in a non-vegan household can often feel like choices are extremely limited. Not so if you bring this scrumptious vegan-to-the-core nutloaf to the table. Even the non-veg family and friends will be tempted to start with a sliver.

My experience in non-veg situations is that the doubting Thomases will take a teeny tiny serving at first and taste it hesitantly, half expecting to not like it. Most are taken by surprise, because the darned nutloaf tastes amazing and they like it enough to head back for a realistic serving size. It’s often the very same experience when non-vegans come to my house for a holiday meal.

Plus, what’s not to like? It looks appealing, has an pleasing nutty, crunchy texture, and has a delicious combination of flavors from the medley of herbs and spices baked into it.

In spite of the long list of ingredients and lengthy directions, the nutloaf is actually a snap to assemble. Even better is that you can make the nutloaf up to two days ahead of the holiday frenzy. I’ve even served it cold, but it’s truly much tastier enjoyed nice and warm.

To reheat the nutloaf, remove it from the refrigerator about 2 hours ahead. Preheat the oven to 350 degrees F. and cover the nutloaf with aluminum foil. Tuck it into the oven for about 15 to 25 minutes, or just until heated through.

It’s even terrific as leftovers! There are many times I’ll actually make an extra-large quantity of several dishes, just so I’ll have leftovers. Those leftovers are a blessing when you have out of town family visiting for the holidays and you’re on the run touring them all over the city. it’s so nice to come home to a meal that simply needs a few minutes to warm.

Almond Nutloaf 3I played with a little different way to garnish the nutloaf. It’s easy to make a tomato rose. All you need is a very sharp paring knife and a small tomato. Start by paring the tomato skin close to the stem end and work your way around and around cutting a thin layer of skin somewhat unevenly to create a more natural look. When you’ve pared the tomato completely, then start rolling the skin into a coil with the inner side facing outward. Secure it with a toothpick or two.

If you’re not up for the Tomato Herb Gravy, that’s OK. You don’t NEED it absolutely, but it’s really nice to have that extra little feature in a meal that adds the finishing touch. And, if you’re serving mashed potatoes, you’ll have the gravy all made.

Don’t have a springform pan? No problem. Line an 8 x 8-inch baking dish with enough parchment to drape over the edge on two opposite sides. When it’s all baked, you can lift the nutloaf by the extended parchment and transfer it to a serving platter.

I hope you’ll make this dish and send me some comments. I’d love to read about your experience.

Yield: 8 to 10 servings

1 pound Russet potatoes, unpeeled, scrubbed and coarsely cut into chunks
2 onions, coarsely chopped, divided
3 cloves garlic, coarsely choppedAlmond Nutloaf 3
2 1/4 teaspoons salt, divided
Water

2 cups whole raw almonds

1/3 cup raw walnuts
1/3 cup raw pecans

4 medium, fresh tomatoes, seeded and diced
1/2 cup matzoh meal or bread crumbs
1/4 cup tomato paste
4 cloves garlic, finely minced
1/2 teaspoon ground nutmeg
1/2 teaspoon ground cinnamon
1/4 teaspoon dried basil
1/4 teaspoon dried thyme
1/4 teaspoon dried marjoram
1/4 teaspoon ground black pepper
1 or 2 pinches cayenne (optional)

1 recipe Tomato Herb Gravy (below)

Garnish

1 or 2 medium tomatoes, diced
Fresh dill, parsley, or cilantro

  1. Preheat the oven to 375 degrees F. and remove the collar of a 9-inch springform pan. Line the bottom of with parchment cut 2 inches larger than the pan. Snap the collar back on and lightly oil the sides. Use a scissors to cut away the excess parchment. Place the pan on a large rimmed baking sheet and set aside.
  1. Put the potatoes in a 2-quart saucepan and add 1/4 of the onions. Add the garlic, 1/2 teaspoon of the salt, and water to cover. Cover the pot and bring to a boil over high heat. Decrease the heat to medium and simmer for 8 to 10 minutes or until the potatoes are fork tender.
  1. Meanwhile, put the remaining onions in a food processor and pulse-chop until they are finely minced. Transfer them to a large skillet and add about 1/4 cup of water. Cook and stir over high heat for about 5 to 7 minutes, or until softened, adding 1 or more tablespoons of water as needed to prevent burning.
  1. Put the almonds in a food processor and process until they are finely ground, yet slightly textured. Transfer them to a large bowl.
  1. Process the walnuts and pecans in the food processor until finely ground, yet slightly textured. Add them to the bowl with the almonds.
  1. Thoroughly drain the onions and potatoes in a colander. Transfer them to a medium bowl and mash them well. Then, add them to the bowl with the nuts.
  1. Add the tomatoes, matzoh meal, tomato paste, garlic, the remaining 1 3/4 teaspoons salt, nutmeg, cinnamon, basil, thyme, marjoram, pepper, and cayenne, if using. Mix the ingredients thoroughly to distribute the seasonings evenly.
  1. Spoon the mixture into the prepared springform pan, packing it firmly with a spoon or your hands to avoid air pockets.
  1. Arrange the diced tomatoes over the top and press them into the surface lightly. Bake 60 to 70 minutes or until firm when gently pressed. Remove the pan from the oven and allow it to stand for 15 to 20 minutes.
  1. To Serve, place the springform pan on a large serving platter. Loosen the edges of the nutloaf with a knife and lift off the springform collar. Garnish the platter with fresh herbs. Use a serrated knife to cut the nutloaf into serving wedges and serve the Tomato Herb Gravy on the side.

Tomato Herb Gravy

3 cups water
3 medium size Roma tomatoes, diced
2 large cloves garlic, crushed
2 teaspoons lemon juice
1/2 teaspoon onion powder

1/2 teaspoon dried rosemary leaves
1/2 teaspoon dried thyme leaves
1/2 teaspoon dried sage leaves
Salt and pepper

2 tablespoons arrowroot or cornstarch
2 tablespoons water

  1. Combine the water, tomatoes, garlic, lemon juice, and onion powder in a 2-quart saucepan.
  2. Create a bouquet garni by placing the rosemary, thyme, and sage into the center of a small piece of cheesecloth. Then gather up the ends to enclose the herbs, and tie it securely with a string. Add the bouquet garni to the saucepan and bring to a boil over high heat.
  3. Lower the heat to medium and simmer about 5 to 8 minutes. Remove the bouquet garni and discard it. Season with salt and pepper.
  4. Combine the arrowroot and water in a small cup or bowl and stir it well to form a runny paste. Add the paste to the gently simmering tomato gravy a little at a time stirring with a wire whip for about 1 minute, or until the gravy is thickened to desired consistency. Cook one minute longer and season to taste with salt and pepper. Makes about 3 1/4 cups.